

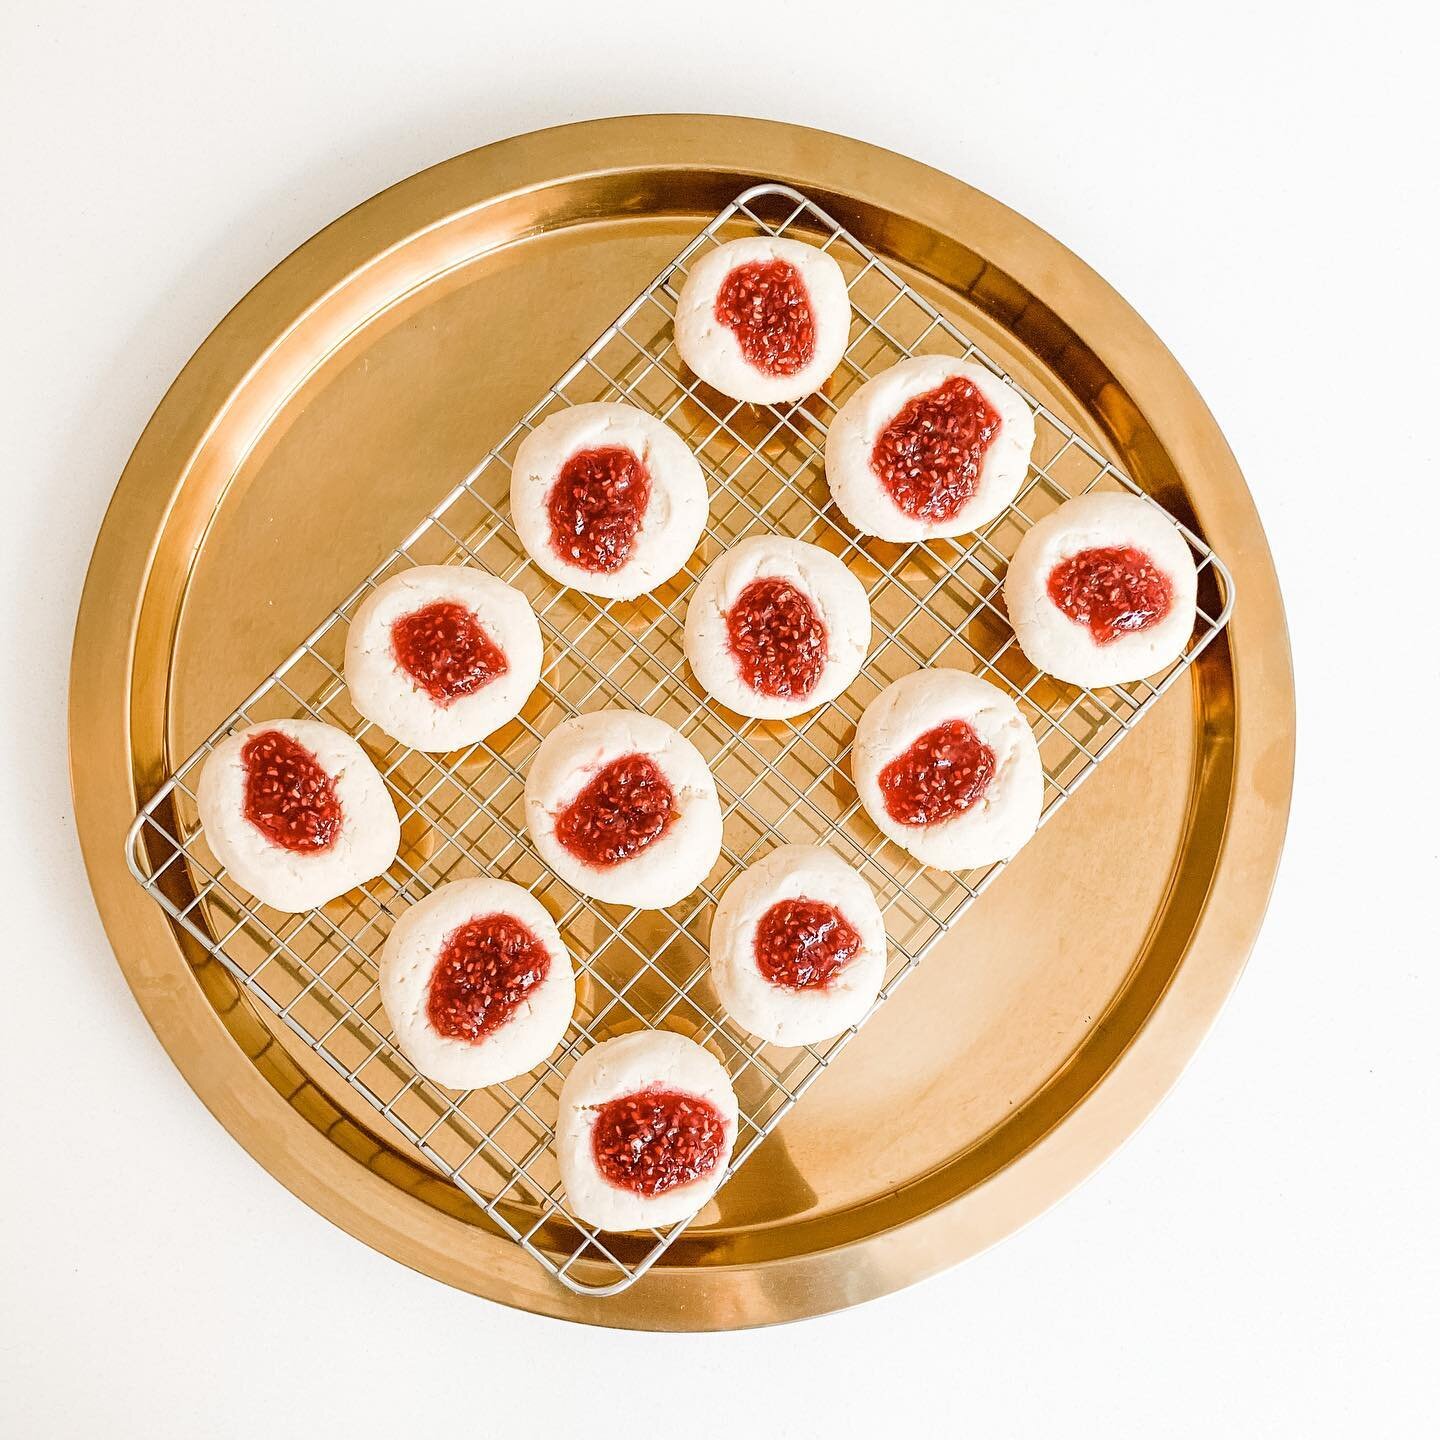
happy birthday to me cake
Mini chocolate cake with vanilla buttercream and white chocolate ganache drip
I know I said last week would be my last post until after the baby, but it was my birthday this weekend, and I couldn’t resist making myself a little birthday cake! So I think this will actually be my last post for a few weeks.
I really wanted to try this drip decorating technique before I took my baking break, so figured that for my birthday, I’d give myself a new cake lesson :)
Since we’re still just a family of two, I couldn’t bring myself to bake a full 3-layer cake, even with the 6-inch cake pans I’ve got. So even though I do love mini baking supplies, I decided the best way to DIY a mini cake with what I do already have would be to engineer a few layers from a sheet cake and cut a few small circles out. So the recipe below is for a one layer sheet cake from Recipe Girl, and I used a 10.5x15.5 inch sheet pan. I then used a small 4.75-inch bowl to cut out circles from the cake. Here’s where I wish I had a circular cookie cutter to get cleaner circles. I think because I cut the rounds out with a knife & bowl, it would’ve turned out better if I chilled the sheet cake in the refrigerator for at least 20 minutes before I started cutting into it. In the end, my rounds weren’t cut out cleanly and I think that also led to a bit of lopsidedness and the difficulty I had getting clean edges around the top with the icing. You can see below… I did what I could.

After cutting my cake rounds out, I did throw them into the fridge for about 20-30 minutes while I made the icing, which was just a very simple vanilla American buttercream. As you can see above, I got 6 rounds from my sheet cake, but only ended up using 3 for the cake. I originally thought I might try to make a second cake, but my husband and I ended up snacking on the extra rounds before I even finished making the one cake!
So using 3 rounds for one full cake, I just layered on the butter cream between cake layers and a crumb coat. Then I tossed the cake back in the fridge to allow the crumb coat to chill. While the cake was chilling, my husband took me out for a birthday dinner, so the cake had a little extra time to chill than normal.
Once we were back from dinner, I colored the rest of my icing pink using gel food coloring and got to decorating. Here’s where I could really use some more practice and nice, even cake layers. I tried to just slab on the pink icing and smooth it out with a cake scraper, but this didn’t go as well as I had planned. I think next time, I’ll take the time to pipe the icing around the cake first to make sure that I have an even coat of icing around the cake before smoothing it out with the scraper. I also ended up watching a few more YouTube videos on this, and apparently it’s important to pipe a higher layer that juts out over the top edge of the cake so that you can pull it down towards the center.
I actually ended up giving up on perfectly smooth layers and a crisp edge since I knew I’d cover it up for the most part with the drip technique. To get the drip layer, I made a simple white chocolate ganache using white chocolate chips, heavy cream, and some gel food coloring. I did the spoon drip technique because I didn’t have a squirt bottle, but this is definitely the less precise way to do it and actually drop me a little nuts. Next time I try the drip decor, I’m definitely getting a squirt bottle on Amazon first.
To get the drips, just spoon the ganache onto the top of the cake and push it out towards the edges with the back of the spoon. Be careful as you approach the edges if you want thin drips down the sides. I accidentally got a few giant drips which you can see in the photos.
After you have the drips all around the cake, I’d recommend putting the cake back into the refrigerator if you plan to add more decoration on top of the cake. I did not do this, and you can see the rest of my icing started to fall over and run with the ganache.
Oh well… just another one for baking bloopers, and I’ve got more self-taught knowledge for next time!


mini chocolate cake with vanilla buttercream and white chocolate ganache drips
Prep Time 10 mins | Cook Time: 15-20 mins | Inactive Time: 50 minutes | Decorating Time: 30 mins | Total Time: 1 hour, 50 mins
CHOCOLATE CAKE INGREDIENTS
2C (256g) all-purpose flour
2C (402g) granulated sugar
1/4 teaspoon salt
1/2C buttermilk, room temperature
2 large eggs, room temperature
1 teaspoon vanilla extract
1 teaspoon baking soda
1C (2 sticks) salted butter, room temperature
4 heaping tablespoons cocoa powder
1C boiling water
VANILLA AMERICAN BUTTERCREAM INGREDIENTS
2C (4 sticks) unsalted butter, room temperature
4C (512g) powdered sugar
1/2 tablespoon vanilla extract
WHITE CHOCOLATE GANACHE INGREDIENTS
1C white chocolate chips
1/3C heavy cream
DIRECTIONS:
Pre-heat oven to 350F. Grease and line a 10.5x15.5inch pan with parchment paper.
In a large bowl or one bowl of a stand mixer, whisk together the flour, sugar, and salt with a hand whisk or fork. In a separate large bowl or in another bowl for the stand mixer with the paddle attachment, beat the buttermilk, eggs, vanilla, and baking soda.
In a medium saucepan, melt the butter and add the cocoa. Whisk to combine. Add the boiling water to the pan, mix, and heat until bubbling. Turn off the heat.
Pour the chocolate mixture into the flour mixture, and mix on low-medium speed using the paddle attachment of the stand mixer. With the mixer still on, pour in the egg mixture and continue to mix until incorporated and smooth.
Pour the cake batter into the cake pan. Bake 15-20 minutes or until a toothpick inserted into the center comes out clean.
Remove from the oven, and allow to cool for 10 minutes. Flip onto a cooling rack and allow to cool completely. Place the cake into the fridge for at least 20 minutes.
Remove the cake from the fridge, and cut six 4-5-inch circles from the sheet cake. Place the rounds in the fridge while you make the buttercream.
To make the buttercream, place the butter in a large bowl and whisk with either a hand mixer or a stand mixer with the paddle attachment. Add the powdered sugar and beat until smooth.
Remove the cake rounds from the refrigerator and add a layer of icing between each layer. Add a thin layer of icing to the top and around the cake for a crumb coat. Place the cake back in the fridge for at least 30 minutes.
While the crumb coat cools, color the remaining buttercream with gel food coloring.To decorate the cake, place the remaining icing into a piping bag, and pipe even layers all the way around the cake. Then, using an icing smoother, smooth the icing while turning the cake around until smooth. Place the cake back in the refrigerator while making the ganache.
To make the white chocolate ganache, heat the white chocolate chips and heavy cream and mix until smooth. Remove from heat and add gel food coloring if desired. Allow the ganache to cool to room temperature.
Carefully spoon the ganache onto the cake and push towards the edges until it drips down the sides. Continue to do this all around the cake.
If desired, use any remaining icing to pipe dollops around the cake. I used a Wilton 4B piping tip to create the design above. Just be sure to chill the cake again for at least 20 minutes so that the ganache hardens a bit before adding more icing to the top.

rice krispies treat yo'self
Rice Krispies treats with browned butter and white chocolate ganache. Not quite the childhood treat you remember - it’s better!
So this may be my last post for a few weeks. I’m currently 37 weeks pregnant, and I finally have to admit that it’s getting very difficult to move around and be on my feet for very long. Turns out that barefoot & pregnant in the kitchen is actually harder than I thought it would be!
Since I can’t really stand comfortably for a long time anymore and bending down to reach into the oven has also proven very challenging, I was in search for a good, easy, no-bake recipe for this weekend. Luckily, I recently discovered Chenée Today on Instagram earlier this week, and she’s got a real fancy recipe for a childhood favorite: Rice Krispies Treats!
What makes these Rice Krispies treats fancy, you ask? Two things: browned butter and white chocolate ganache. I mean… did you know what a ganache was when you were seven years old? That alone makes these adulting Rice Krispies, if you ask me!
But even with these two fancy additions to the classic treat, it’s still incredibly easy to make. And the best part - no bake required! So for me, that meant no bending down or standing in a hot kitchen!
So, let’s get into it then! We start with the browned butter. This really helps to give the Rice Krispies an extra almost nut-like flavor. And all “browned butter” really means is… burn it a little ;) While the butter was browning, I went the easy route with the ganache and popped some white chocolate chips & heavy cream into the microwave. Mullti-tasking at its finest!
Here’s a photo of my butter all browned up.
Tip: use a pot with a light colored inside so that you can really see the color of the butter turning.

Once the butter is all browned up, fold the marshmallows in. Stir it over the heat until it’s all melted. Once the marshmallows have melted, remove the pot from the heat and stir in the white chocolate ganache.

Once that’s all incorporated, fold in the Rice Krispies until all of the cereal is incorporated and covered in the marshmallow/butter/chocolate mixture. Then transfer the mixture to a prepared 9x13 pan, allow it to cool for an hour, and THAT’S IT! You’ve got yourself some fancy browned butter, white chocolate Rice Krispies treats. Enjoy!
Oh, and if you want to see how ooey-gooey they are in action, check out my Instagram!!

browned butter Rice Krispies treats with white chocolate ganache
Prep Time: 5 mins | Cook Time: 10 Mins | Total Time: 15 mins
INGREDIENTS:
4 ounces white chocolate
3 tablespoons heavy whipping cream
1 teaspoon vanilla extract
1/2 cup (1 stick) salted butter
16 ounces marshmallows
10 cups Rice Krispies cereal
DIRECTIONS:
Prepare a 9x13 pan with aluminum foil and spray with cooking spray.
Using a microwave safe bowl, heat heavy cream and white chocolate in the microwave in 10-second increments until the mixture is melted. Stir between intervals. Stir in the vanilla extract until smooth. Set aside.
In a large pot over medium heat, heat butter and stir constantly until it is browned and has a nutty aroma.
Add marshmallows and continue to stir until marshmallows are melted. Remove from heat and add in the white chocolate mixture. Stir until incorporated.
Fold in the cereal, and gently mix until cereal is fully coated.
Transfer the mixture to the pan pressing gently to fill the pan to the edges and the top is even.
Cool for at least 1 hour before removing from the pan and cutting.
Serve & enjoy!

age is only a (n)ombré
Ombre cake. Vanilla cake with raspberry compote and lemon buttercream.
Here we are about six months into this global pandemic, and there’s a lot that I miss about pre-pandemic days. Crowded bars, concerts filled with people, and birthday parties are just a few of those things I miss. But mainly, it’s doing and going to all of these places with my friends that I miss most.
Well, this weekend, I got to see two of my closest friends for the first time in six months. The last time we had gotten together back in February — which is really the last time I saw most people IRL — I was still keeping my pregnancy a secret, so they’re some of the few who will have actually seen this baby bump before the baby arrives in about a month other than my husband! This weekend was also one of their birthdays (and it was a big one!), so we had so much to celebrate. And what better excuse than a celebration to make a three-layer cake and try out some new decorating techniques!
I’ve been wanting to try this ombré technique all summer long, so was so excited to finally get to try it out. I absolutely love watching cake decorating videos in hyperlapse on Instagram, and this kind of ombré design is just mesmerizing to watch. In case you’re looking for a rabbit hole of endless hyperlapse cake decorating videos, I highly suggest following @cakesbae and @cakesdaily.gram for some truly addicting content. So as soon as we made the plan for this weekend, I got my cake turntable and scraper ready to go!
As someone who’s done a lot of ombré and balayage to her hair, I know the HOURS it takes in a salon chair to achieve that kind of hair color perfection. Luckily, it’s not quite the same when it comes to cake! Definitely one of those things that looks harder & fancier than it is to actually achieve. The main trick here is to make sure you’ve got your crumb coat layered on and to give it time to chill in the fridge a bit before adding your colored coats.
What’s a crumb coat you ask? It’s the first layer of icing that you lay on fully around the cake to catch any stray cake crumbs so that those crumbs don’t appear in your design. Once that crumb coat is on and chilled, the rest is pretty easy.
While the crumb coat chills, that gives you time to prep the different colors for your ombré. For mine, I only used a pink, a light pink, then finished off with a white layer on top, but you can definitely go bigger with more shades if you’d like. Also, for my lighter shade of pink (the middle color), I actually just used a teensy bit of red gel food coloring. Even just one drop from the bottle is too much to get this shade of pink, so I squeezed a drop out onto a plate, dipped a toothpick into the drop, and that’s all that went into my icing. A little bit goes a long way here!
Once you’ve got your icing colors ready and the crumb coat has chilled for about 45 minutes, you’re ready to get the ombré started! Using an offset spatula, start with the darkest color and lay it on thick all the way around the bottom. Then do the same with your lighter shade all the way around the middle, and continue doing this until you get to the top with the lightest or white icing. Don’t worry if it’s messy or that you can see distinct lines between the colors.
Now for the fun part! Grab your icing scraper and press it along the side of the cake with one hand while you spin the turntable with the other. Just keep going all the way around until you’ve got a smooth layer and the ombré will appear right before your eyes!
I think my icing wasn’t quite thick enough (I’ll be adding more powdered sugar next time), so I didn’t quite get the smooth ombré I was hoping for. I was running out of time and still had a few more things to do before my friends arrived, so rather than fickling around with the ombré more, I put the rest of my colored icings into a piping bag and piped out some pretty ombré rosettes around the cake to hide the unevenness. Sneaky, sneaky :) I was actually hoping to try out some multi-colored piping too, so this just seemed like more good practice for me anyway.
After all of my unexpected rosettes, I didn’t quite have enough icing to go around the top of the cake, so I grabbed some pink candied chocolates to finish it off. Sometimes you’ve just gotta do what you can with what you’ve got and hope for the best! This is why I’ve added this to my baking bloopers section, but I’m still pretty proud of how it turned out. Check out my Instagram for a video of the full cake spin!
Full list of ingredients & directions below. Vanilla sponge recipe is the “wedding cake” recipe from one of my go-to recipe books A New Way to Cake from Benjamina Ebuehi. Raspberry compote and lemon buttercream were winged on the spot by me :)


vanilla cake with raspberry compote and lemon buttercream
Prep Time: 30 mins | Bake Time: 20-30 minutes | Inactive Time: 2 hrs, 45 mins | Total Time: 3 hrs, 45 mins
VANILLA CAKE INGREDIENTS:
3 1/2 cups (450g) all-purpose flour
3 1/2 teaspoons (18g) baking powder
1/2 teaspoon baking soda
1/4 teaspoon salt
1 1/4 cups unsalted butter, room temperature
375 grams granulated sugar
5 eggs, room temperature
1 cup buttermilk
1 tablespoon vanilla extract
RASPBERRY COMPOTE INGREDIENTS:
170 grams raspberries
1/4 cup (50g) granulated sugar
1/4 cup water
1/2 teaspoon cornstarch
LEMON BUTTERCREAM INGREDIENTS:
3 cups unsalted butter, room temperature
640-704 grams powdered sugar, sifted (start with 640g, and add more depending on preferred consistency)
2 tablespoons lemon juice
Zest of 1 lemon
DIRECTIONS:
Pre-heat oven to 350F and grease three (3) 6-inch cake pans and line them with parchment paper.
Sift together the flour, baking powder, baking soda, and salt in a large bowl and set aside.
Using a hand mixer or stand mixer with the paddle attachment on low-medium speed, beat the butter and sugar until pale & creamy (about 3-5 minutes). Add the eggs one at at a time, scraping the sides down as needed. With the mixer still running and turned down to low, add half the flour mixture. Once the flour is combined, add the buttermilk, vanilla, and remaining half of the flour mixture. Beat for a few seconds until the batter is smooth.
Fill each pan 2/3rds of the way to the top.
Bake for 25-30 minutes, or until a toothpick inserted into the center comes out clean.
Allow the cakes to cool on a wire rack for at least 10 minutes before flipping the pans over to remove the cakes. Once removing the cakes from the pans, allow the cakes to cool completely on a wire rack. Wrap the cakes in plastic wrap and place in the fridge for at least 2 hours or ideally overnight.
Make the raspberry compote. Add the raspberries, water, and sugar to a small saucepan over low to medium heat. Bring to a boil while mashing the raspberries with the back of a wooden spoon. Once the mixture is boiling, add the cornstarch and boil for 10 minutes until it thickens. Remove from heat and let it cool while you make the icing.
Make the lemon buttercream. Using a hand mixer or stand mixer with the paddle attachment, beat the butter and powdered sugar together until combined. Scrape the sides down as needed. Add the lemon zest and juice, and beat until fully combined. Add more powdered sugar to thicken if needed.
Remove the cakes from the fridge and trim off the tops with a long serrated knife if uneven.
Assemble the cake. Add a dollop of icing to the middle of the cake turntable, then place a 6-inch cake round (cardboard), and add another dollop of icing to the middle of the cake round. Place the first cake onto the cake round. Spread a layer of icing onto the top of the cake.
Tip: After spreading icing over the cake, use a piping bag with a round tip to outline the outer ring of the cake top. This will help to keep the compote from spreading out to the sides of the cake.
Spread a layer of the compote over the icing within the icing ring.
Place the next cake over the raspberry compote and repeat the icing and raspberry layers, followed by the last cake.Using an offset spatula, cover the cake (sides and top) in a layer of icing to create the crumb coat. Place the cake in the fridge for at least 45 minutes.
Divide the remaining icing into 3 separate bowls (about 1 1/2 cups each). Use pink gel food coloring in one bowl and mix until fully combined. Use a toothpick in a drop of red gel food coloring to color the second bowl of icing and mix until fully combined.
Decorate the cake. Take the darker of the pink icing, and cover the bottom third of the cake. Take the lighter pink and cover the middle third. Take the remaining white icing and cover the top third and top of the cake. Holding the cake scraper in one hand and pressing it against the cake, spin the turntable with the other hand. Continue to spin until the layers are smooth and the ombré pattern appears.
Some icing will rise up over the top of the cake. Wipe the excess icing off of the cake scraper (I wiped it onto the mixing bowl in case I needed it later — which I did). Spin the turntable and use the cake scraper to flatten the excess icing over the top of the cake and smooth the top.To add ombré rosettes, or to make any other design on the cake, add any remaining icing from all colors to a piping bag.
Tip: place the piping bag into a tall glass and open the bag over the top of the glass. Add each color of icing to different sides of the piping bag. Remove the piping bag from the glass and squeeze the icing down until it starts to come out. Pipe out any finishing touches!

a pavlova-ly summer treat
Summer berry pavlova
Next weekend is Labor Day, which marks the end of summer, so I thought I’d better take advantage of the summer flavors and get a little more practice with my meringue skills. I’ve also had a page marked in my copy of A New Way to Cake all summer, so figured I’d start working my way through it.
I followed all the tips directed in the book for the pavlova, which meant extra planning & patience on my part to start this a day before to allow the pav to cool overnight. I thought by taking on baking as a hobby this summer, I’d just be improving my skills in the kitchen, but think I’ve noticed an improvement in my patience as well. Just in time for this huge endeavor of child rearing that will begin in only 5 short weeks now!
Since the pavlova is basically just a giant meringue, it’s a very delicate cake. Reason it’s best to start this process the night before is to allow the meringue to cool slowly in the oven once you turn the heat off so that it doesn’t experience a rapid temperature change. That’s the theory at least. I still got a couple cracks in my meringues, but no worries with this cake — it’ll be pretty easy to hide the cracks with these layers.

Once the meringues are done and cooled (this morning for me), the rest of the layers are easy to whip up… literally. Just a little homemade whipped cream and macerated berries, then layer, layer ‘em up and repeat!
If macerated berries sounds fancy to you, trust me it’s not. I went into all kinds of detail on it when I made strawberry shortcake biscuits a few weeks ago. it’s essentially just allowing the berries to sit in some sugar for 30-45 minutes to let the juices all flow out.

Forgot to take a pic of the whipped cream, but that’s nothing to call home about anyway. Just a couple cups of heavy whipping cream & vanilla extract, and you’ll never need to buy a can again! Once you’ve got the cream, just pile it over your first layer of meringue, then half the berries, then repeat. Pile high and you’ve got your pav!

summer berry pavlova
Prep Time: 20 mins | Bake Time: 90 mins | Inactive Time: 2-8 hours
PAVLOVA INGREDIENTS:
250g granulated sugar
150g egg whites
1 teaspoon cornstarch
WHIPPED CREAM INGREDIENTS:
2 1/2 cups heavy whipping cream
1 tablespoon vanilla extract
BERRY TOPPING INGREDIENTS:
110g blueberries
150g diced strawberries, plus a few extra berries sliced thin for decoration
75g granulated sugar
DIRECTIONS:
Preheat the oven to 375F and line two baking sheets with parchment paper. Using a plate or any other round shape, trace an 8-inch circle on each piece of paper with a pencil, then flip the papers over so that the meringues don’t touch the pencil lead.
Start making the meringues. First, heat the sugar in the oven until the sides start to melt (about 5 minutes). Hot sugar dissolves easier in the egg whites to make the meringue. While, the sugar is heating, add the egg whites to the bowl of your stand mixer. Make sure the bowl is VERY clean.
Tip: wipe the bowl with a squeeze of lemon or a bit of white vinegar to make sure no oils remain in the bowl.
Using the whisk attachment on low-medium speed, start beating the eggs until they become foamy. Turn the mixer speed up to medium-high until medium peaks form.By this point, your sugar should be heated enough and you can remove it from the oven. Turn the oven down to 250F. Then carefully & slowly start to add one spoon of heated sugar at a time to the egg whites with the mixer still on. Continue to beat the mixture until it’s thick and glossy, and it more than quadruples in size.
Once you finish adding all the sugar, beat for another 2 minutes. Then add the cornstarch and beat for another few seconds until it’s incorporated. The meringue should be done, but you’ll know by the stiff peaks and you’ll be able to flip the bowl upside down without anything falling out.
Spoon the meringue onto the prepared baking sheets using the circles as a guide. Don’t worry if the top isn’t flat because it’ll get covered up by the cream & berry layers. Place the trays in a single layer in the oven for 90 minutes or until the top of the meringues are firm to the touch.
Tip: don’t open the door too much or you’ll risk cracking the meringues with the temperature changes.Once the meringues are done, place them back in the oven and turn the oven off. Allow them to cool in the oven rather than at room temperature to help prevent cracking. Allow them to cool for at least 2 hours or overnight if possible.
Prepare the berries. Add the berries & sugar to a bowl and mix together. Let it sit for 30-45 minutes, stirring occasionally.
Prepare the whipped cream. Add the heavy whipping cream & vanilla extract to the bowl of your stand mixer. Using the whisk attachment, beat on medium-high speed until you have stiff peaks. Keep the whipped cream cool in the fridge until you’re ready to assemble.
Assemble the pav! Carefully remove the first meringue from the parchment paper and place on your serving plate or stand. Add a layer of whipped cream, then a layer of berries. Remove the second meringue from the parchment paper, and pile it on top and repeat. I used a few more strawberries thinly sliced to decorate the edges, but you do you! I’d also recommend draining the juices or else it gets a bit messy. Pile high & enjoy!

if oreos got a french makeover
Chocolate macarons with vanilla French buttercream
I skipped posting last week because I completely failed on my first attempt at French macarons. It took me hours and a huge mess in the kitchen, and all I wound up with was runny batter and flat, inconsistent “cookies.” Not sure why I was so hard on myself since I knew how much technical skill goes into making French macarons. But I thought I was well-prepped and had done enough research to get this one right on the first try. Yeah, right!
Well, after feeling like I had wasted all those ingredients, all that time, made such a mess, and didn’t even have any content to post on here for the week, I realized that I had at least known where I went wrong in my first attempt. And a lesson learned is not a fail at all! And not everything that goes up on the Internet has to be perfect because that’s not real. We don’t always (or usually) get things right the first time in life, and that’s perfectly okay and not something to ever really be embarrassed about. So, rather than not posting when my bakes don’t turn out as planned, I’ve decided that’s not a reason not to create this content, nor a reason to skip a week posting because the content is the lesson itself. With that, I’m adding a new section on here for a series called: baking bloopers.
I’ll post my mistakes, tips I learned from those mistakes, and will continue to update the posts until I get it right.
So, to start off the first post of baking bloopers, here’s a photo last week’s first attempt at French macarons:

Excuse the caption - I forgot to save a picture aside from my Instagram Story. Also, check out that 33 week preggo bump!
After getting these sloppy (but tasty) little cookies, I realized I made 2 very big mistakes:
I did not sift my dry ingredients finely enough. I was much too impatient with that step. I also realized my sieve wasn’t large enough for my impatience and that I should probably take more steps sitting down with this growing belly & these increasingly swollen pregnant feet!
My peaks were not stiff enough. I thought I had gotten my egg whites to stiff peaks, but turns out, they need to be REALLY stiff peaks. So stiff that the egg whites feel like marshmallows and you can actually pull out multiple peaks when you remove the whisk from the meringue.
Once I realized my mistakes, I watched a ton more videos and read up on more tips & tricks. I also got a couple more inexpensive little tools that helped compensate for my unsteady hands and impatience during the sifting process. “What tools?” you ask?
To help with the sifting process, I got a handy little 3-cup hand crank sifter. This made sifting the almond flour, powered sugar, and cocoa powder extra fine much much easier than my small 1-cup sieve. It also helped to keep the mess a bit more tamed than last week!
To help with my unsteady hands and keep the macarons more uniformed in size, I got this macaron silicon mat. I didn’t even know these existed until I came across some videos that used them. I figured if expert bakers could admit that they need a little cheat for this step, then I could use one too.
With more knowledge, lessons learned from my first try, and the right tools on hand, I confidently entered this weekend ready to conquer this patisserie delight!
First step: sift the dry ingredients together very finely. To be extra cautious, I actually sifted the dry ingredients three times over! Or maybe I was just playing with my new toy :)

These are my dry ingredients pre-sift.

And here they are after three rounds of sifting. Extraaaaa foine.
Next, you whisk the egg whites until you can’t whisk anymore and your arm feels like it’s going to fall off! Just kidding… you’ll definitely need an electric hand mixer or a stand mixer for this step. Even with a stand mixer on the max speed, I was getting impatient at how long it took to get to the extra stiff peaks needed. I can’t imagine how French bakers used to pull this off pre-appliances or electricity! As mentioned above, whisk them until you’ve got a meringue that feels like marshmallows when you drag a whisk through it and you pull out multiple peaks onto your whisk.
Once you’ve got your meringue with extra stiff peaks, then starts the macronage process. Apparently this part is best done by hand, and I did not take any short cuts here. You’ll need to first fold in about one-third of your dry ingredients into your meringue using a spatula. Folding is key here so that you don’t create extra air bubbles. Once that first third is incorporated, add the remaining dry ingredients and continue to fold until it’s all incorporated and the mixture resembles lava. A ton of recipes online kept saying that, but I really couldn’t tell what lava meant. I thought I got to a lava-like consistency last week and that was too runny! John Kanell of Preppy Kitchen described it best in his video where he showed that the mixture should fall off the spatula so that you can form a figure 8 in the bowl, but the 8 doesn’t incorporate back into the mixture right away. He also made an incredibly helpful YouTube video that I watched several times, especially to understand the right type of stiff peaks to watch out for!
When you’ve got that lava-like mixture forming figure 8’s, transfer the mixture to a piping bag with a round tip and begin forming your cookies. I used my new macaron mat, but if you have steady hands and can pipe 1-inch circles easily onto parchment paper, then go for it! You saw what my macarons looked like last week though (which was also a combination of not finely sifted dry ingredients and meringue that wasn’t meringue-y enough).

Air bubbles are another one of macaron’s enemies. To get the air bubbles out, you have to bang the tray a few times really hard on the counter. This not only lets the bubbles out, but also flattens the mixture out. Because of that, I didn’t fill the wells all the way to the edges. After a few bangs on the counter, the batter pushed its way out to the edges itself. Then, just let these little guys sit for a bit. They’re ready to bake when you touch the top and it’s dry to the touch. This usually takes about 40 minutes. Once they’re ready, just pop ‘em into the oven for 12 minutes at 300F.
Apparently, they can only go into the oven as one layer at a time. So if you’ve got two trays of macarons that don’t fit on one shelf in your oven, bake them one at a time. Don’t stack them up in there as that can change how the heat gets distributed and will mess up how they end up baking in there.
If you’re good at multi-tasking, go ahead and start on your filling while they’re in the oven. You could also get started on your filling while they’re resting before you popped them into the oven. You can fill your macarons with just about anything from jams, chocolates, curds, etc. I went with a classic vanilla French buttercream.
My idea here was to give the Oreo a French makeover. Chocolate macaron cookies sandwiching a vanilla French buttercream. So after my first failed attempt, a week of wallowing in my baking woes, a little more research, and a few bucks on Amazon, here’s what we got! A baking blooper no more!
Base recipe from Preppy Kitchen, but tweaked a bit to make chocolate macarons instead of the classic recipe.
chocolate macarons with vanilla french buttercream
Prep Time: 15 mins | Bake Time: 12-15 mins | Inactive Time: 40 mins | Total Time: 1 hour, 10 mins
Makes 30-35 1-inch macarons
MACARON COOKIE INGREDIENTS:
100 egg whites, room temperature (about 3 large eggs)
140 grams almond flour
90 grams granulated sugar
115 grams powdered sugar
15 grams unsweetened cocoa powder
1/4 teaspoon cream of tartar
VANILLA FRENCH BUTTERCREAM INGREDIENTS:
1 C unsalted butter, room temperature and cubed
5 egg yolks
100 grams granulated sugar
1 teaspoon vanilla extract
3 tablespoons water (30 mL)
1 pinch of salt
DIRECTIONS:
Sift the powdered sugar, almond flour, and cocoa powder into a bowl. Repeat 2 more times.
Add the room temperature egg whites into a large mixing bowl or bowl of your stand mixer. Make sure your bowl is very clean.
Using an electric hand mixer or a stand mixer with the whisk attachment, whisk the egg whites. Once they begin to foam, add the cream of tartar and whisk until incorporated. Slowly add the granulated sugar. Increase the mixer speed to high and beat until stiff peaks form. The egg whites should collect in the whisk attachment, and feel like marshmallows when you run a whisk through it. Multiple peaks should attach to your whisk when you pull it out of the meringue.
Using a spatula, fold one-third of the dry ingredients into the meringue. Add remaining dry ingredients and fold gently until it’s fully incorporated and the mixture flows like lava and can form a figure 8 that does not dissolve back into the mixture.
Spoon the mixture into a piping bag with a round tip.
Pipe into 1-inch circles or onto a macaron mat holding the piping bag at 90-degrees or perpendicular to the counter.
Tap the baking sheet hard onto the counter several times until air bubbles are released. Carefully pop any remaining air bubbles with a toothpick.
Allow it to sit for 40 minutes before placing in the oven.
While the pre-baked cookies sit, pre-heat the oven to 300F and make the filling. Combine the sugar & water in a medium saucepan. Heat over low heat while stirring until the sugar dissolves. Increase to medium-high heat and bring to a boil. Cook until the syrup reaches 240F.
While the syrup cooks, put the yolks in a stand mixer with the whisk attachment and beat until thick & foamy and it turns a pale yellow.
Remove the syrup from the heat and carefully pour it into the egg yolks while the mixer is still running on medium speed.
Continue mixing until the bottom of the bowl is cool to the touch, and the yolk mixture is room temperature.
Add the butter 1 cube at a time while the mixer is running on medium speed. Allow each cube to incorporate before adding the next.
Add the vanilla & salt, and mix until smooth & creamy. About 5-6 minutes. Transfer to a piping bag with round tip.
When cookies are dry to the touch, transfer baking sheet to the oven. Bake for 12-15 minutes.
Remove from the oven and allow the cookies to cool completely before removing from the baking sheet or macaron mat.
Carefully remove the cookies and assemble macarons. One at a time, take a cookie, pipe the filling onto the cookie, then top with another cookie. Repeat until all macarons are assembled.

roses for my (u)bae
Ube cake roll with ube buttercream
Before I get into this weekend’s bake, I have a very important PSA: Pregnancy brain is REAL. I’ll admit that before I was pregnant, I thought it was just a cute little excuse. But 7 months in… it is 100% real and 100% taking over my brain. The latest example of pregnancy brain in full effect in my house: I opened my fridge this weekend and found that somehow there were 7 full boxes unsalted butter in there. That’s right. SEVEN.
Turns out that for the last few weeks, instead of ordering salted butter for my morning toast, I have continued to order UNsalted butter. There were definitely a couple of times where I caught the error myself after unpacking the grocery delivery, but then with each new order, I still kept managing to order unsalted butter. On Friday night, I was looking around for a snack, and found 5 boxes in the usual butter area. Already, it had hit me that pregnancy brain had obviously struck again. Then this morning, I moved the carton of eggs, and found 2 more boxes of butter! I have a feeling my husband placed the other 2 boxes away from its friends in an effort to hide the massive overstock of unsalted butter from me as not to make me feel badly. What a guy.
Well, I’ve got to do something with all this butter now. So, while I had already planned to make this ube cake roll this weekend, I changed it up a bit to include an ube buttercream icing to top it with purple rosettes. And you know what that means? That’s 1 whole box down and 6 more to go! So please, if you have any ideas for some butter-heavy recipes, do let me know in the comments… Just don’t tell my doctor!
Alright. PSA over. On to the ube cake! And if you’re new to ube, check out my blog post on ube swirl rolls where I share a bit of the explanation on what ube is :)
For the cake roll, I found this recipe for an ube chiffon cake from Woman Scribbles. Similar to last week’s lime ricotta cake, this one required some technical skills separating eggs, getting the egg whites to stiff peaks, then folding the beaten egg whites into the ube batter to get it ever so light & airy.

Honestly most of the work for this cake was in the ingredient prep. Since you’re just baking a thin sheet cake, the actual bake isn’t very long at all. It was barely enough time for me to finish cleaning up the mess I made making the batter! That reminds me - one more PSA here: ube flavoring is M E S S Y. This was my first time working with it, and while it makes for some gorgeous cakes & icing, this stuff can truly stain. I recommend covering your surface or having a Mr. Clean Magic Eraser handy. I ended up working on my silicon baking mat after I realized how hard it was to get a small drop cleaned off of my counter.
Anyway, once you’ve got your batter done and in your sheet pan, it only needs to bake for about 10 minutes until it’s ready. Then you’ve got some more technical skill fun. I’ve seen enough episodes of the Great British Baking Show where they make cake rolls to know that you’ve got to start rolling the cake while it’s still hot so that it can keep that shape later even after you’ve spread on the icing. The original recipe directions didn’t call for this, but I’ve seen enough disasters on GBBS to know that I could not let the cake cool before doing this.
So once you carefully remove the cake from the pan with the parchment paper still on, roll it tightly starting from one of the short sides. Place the rolled cake on a wire rack, and let it cool completely like this. While the cake cools, make the buttercream.
For the buttercream, I just used a classic vanilla buttercream recipe of butter, powdered sugar, and a couple tablespoons of heavy whipping cream. Rather than vanilla extract, I went for the same ube flavoring that I used for the cake. I also took an extra step to sift my powdered sugar with each addition to the creamed butter. I had been reading quite a few different recipes, and saw that doing this makes for a creamier, silkier consistency. I definitely made a mess doing this, but think it was worth it. This was definitely the most silky buttercream I’ve ever made!
Once the cake roll was cool, I unrolled it, spread a thin layer of the buttercream on it, then rolled it back up while carefully removing the parchment paper this time. I then wrapped the cake roll in plastic wrap and placed it in the fridge to firm up for about an hour. This also gave me some time to practice piping out my rosettes before I tried it out on the cake itself!
The decorating is of course entirely up to you, but I really wanted to try out my piping skills today, so I went for these rosettes using a 1M cake decorating tip. These look fancier than they are. It’s really just a simple swirl motion, but that 1M tip makes it look just lovely! I’ve still got a lot of practicing to do, but I was pretty happy with these.


My icing seemed pretty soft, and I was afraid it would completely fall apart once I cut into it, so I put the decorated cake back into the fridge for about an hour. Think this is what really helped it to hold up its shape after we cut into it.


Check out the swirl on that!!
UBE CAKE ROLL WITH UBE BUTTERCREAM ICING
Prep Time: 20 mins | Bake Time: 10-12 mins | Decorating Time: 10 mins | Inactive Time: 2 hours | Total Time: 2.5 hours
UBE CHIFFON CAKE INGREDIENTS:
4 large eggs, room temperature and separated into yolks and whites
1/2 C (100g) granulated sugar, separated into two halves
1/4 C milk, room temperature
3 TBS vegetable oil
1 1/2 TSP ube flavoring
3/4 C (96g) all-purpose flour
1/2 TSP baking powder
1/4 TSP cream of tartar powder
UBE BUTTERCREAM INGREDIENTS:
6C (768g) powdered sugar, sifted
2C unsalted butter, room temperature
2 TSP ube flavoring
2-4 TBS heavy whipping cream
DIRECTIONS:
Pre-heat oven to 350F. Grease a 10x15 inch baking pan and line with parchment paper. Grease parchment paper.
In a large mixing bowl, whisk the yolks by hand until it lightens in color. Add 1/4 C (50g) of sugar and whisk until it thickens. Add the milk, oil, ube extract, and whisk until incorporated.
In a separate bowl, whisk the flour and baking powder. Add it to the yolk mixture and beat until it’s smooth and no lumps remain.
In the bowl of a stand mixer with the whisk attachment, beat the egg whites until frothy. Add the cream of tartar and beat on medium speed until soft peaks form (about 3-5 minutes).
Add in the remaining 1/4 C (50g) of sugar, and whisk on high until stiff peaks form.
Fold the beaten egg whites into the yolk batter in 3 parts using a rubber spatula. Fold the mixture until it’s even in color throughout.Pour the batter into the prepared pan and bake for 10-12 minutes, or until a toothpick inserted into the center comes out clean.
Remove from the oven. While the cake is still hot, carefully use the parchment paper to lift the cake out of the pan. Roll the cake up tightly using the parchment paper, and allow to cool completely while rolled.
While the cake is cooling, make the buttercream. Using a stand mixer with the paddle attachment, beat the butter on medium speed until it’s creamy.
Sift in the powdered sugar about 1C at a time continuing to beat the mixture until it’s well-blended. Scrape down the sides as needed.
Once well-blended, add the ube flavoring and 2 TBS of heavy whipping cream. Beat for about 1 minute until all combined. Add more cream if needed (I only used 2 TBS). Beat until smooth & silky.
Unroll the cooled cake and spread a layer of butter cream onto the cake. Re-roll the cake carefully removing the parchment paper as you roll. Wrap the cake in plastic wrap and refrigerate until cool and firm.
Using a decorating bag with a 1M tip, pipe rosettes with remaining buttercream.
Enjoy!

when life gives you limes…
Lime ricotta cheesecake
This week’s bake came about more out of necessity than anything else. I had a surplus of ricotta and limes, so had to find something delicious & tasty to do with all of it!
Since quarantine life started a few months ago, we’ve relied on Instacart for grocery deliveries. I do miss wandering up and down the aisles, browsing through all of the products in the store wondering what I can do with various ingredients, but I am also loving not having to lug heavy bags of groceries home. City life has never made grocery shopping very easy, and over the years, I’ve learned to limit my grocery list to what I can carry with my own two hands. That’s usually meant only buying small sizes of products and not being able to get more than a couple liquid items.
Enter Instacart. Now I’m piling my grocery list up with five 1L tetra-packs of coconut water, five-pound bags of flour, cartons of 18 eggs, OJ, canned goods… my list can quite literally go on and on and on now because I don’t actually have to carry any of this stuff home! Oh what a time to be alive!
Anyway, as much as I’ve been enjoying this delivery life, I have also come to realize it is not fool proof. For one, I’ve got to do a better job at reading the sizing labels on things. Sure, there are some times that I want the large size (I did mention the five pound bags of flour and cartons of 18 eggs that are often on my list), but there are also other times when even I know the big size isn’t necessary. This is especially true for items that don’t have an extended shelf life and considering there’s only myself and my husband in this household. Example: I didn’t need a 907g tub of ricotta cheese. Admittedly, I also may not have realized how big a 907g tub of ricotta cheese was, and was very surprised at the large tub I pulled out of the grocery bag last week.
I was also very surprised to find a produce bag of 10 limes in my shopping bag. This time I was positive I only ordered ONE lime, and I even went back to check my original order to make sure I didn’t mistakenly order 10 limes. With my pregnancy brain these days, I wouldn’t have been surprised if that had happened! Turns out I did only order the one lime, but we think there may have been a “10 for $3” sale. And for that, I can appreciate my shopper looking out for a good deal!

So with all these limes and all this ricotta cheese, I set out to make a citrus ricotta cake. Citrus of choice here: lime. Probably wouldn’t have been my go-to citrus-cheese pairing in another situation, but it’s what I had and it turned out pretty well! Think key lime pie mixed with a light & fluffy cheesecake.
Found this recipe for an orange ricotta cheesecake from Vintage Kitchen, and just did a straight swap of 3 limes for the 2 oranges that the recipe called for. I also took a few liberties with the proportions based on the remaining ricotta I had left, which yielded a cake about an inch and a half thick in my 9-inch spring form pan. I didn’t mind this thickness — made me feel like I could have bigger pieces and not feel as guilty!
Aside from the limes & ricotta, all other ingredients in this recipe were household staples. Just mix with sugar, some eggs, all-purpose flour, and salt, and you’re on your way to a lovely, summery cake.

You might notice from the picture above that my egg yolks & whites are separated. This recipe also called for a bit of technique, so I was eager to practice the art of separating eggs. I’m not very good at doing this very cleanly as I think it typically requires more patience and concentration than I’m usually willing to use. But, I am happy to report back that I only wasted one egg!
You’ll need the eggs separated so that you can beat the egg whites into medium peaks, then fold that into the ricotta batter mixture. I’ve included a photos below of the egg whites once I got them to medium peaks. One other tip I was able to put to good use: before putting your egg whites into your mixing bowl, wipe the bowl down with lemon juice. This helps to ensure that no remaining oils or residue are in your bowl as that may inhibit the egg whites foaming and forming peaks.

Once you’ve got your medium peaks, fold the egg whites into the ricotta mixture. Then transfer the final mixture to your prepared spring form pan.

Last, pop it into the pre-heated oven, and 40-50 minutes later, you’ve got yourself a lime ricotta cake!
PS: I’ve still got a ton of limes that I don’t know what to do it, so taking suggestions! Comment below with suggestions or if you try this recipe out yourself!


lime ricotta cake
Prep Time: 30 mins | Cook Time: 40-50 mins | Total Time: 1 hour, 20 mins
INGREDIENTS:
110 grams granulated sugar, separated into two parts equally in half
550 grams whole milk ricotta, room temperature
4 eggs, room temperature and separated into yolks & whites
22 grams all-purpose flour
1/8 teaspoon salt
zest of 3 limes
DIRECTIONS:
Pre-heat oven to 350F.
Butter a 9-inch round spring form cake pan. Dust with sugar, shaking off excess sugar.
In a large bowl using a whisk, mix the ricotta & zest. Mix for about a minute for a smoother texture.
Add the flour, half of the sugar, salt, and mix well. Combine egg yolks into the mixture.
In another bowl, using a hand mixer or stand mixer with the whisk attachment on medium speed, beat the egg whites for 30 seconds, gradually adding the remaining half of sugar. Increase the speed to high, and beat until it foams, triples in size, and medium peaks form.
With a rubber spatula, add the beaten egg whites to the ricotta mixture in 3 parts, folding in each part. Be careful not to over mix.
Transfer the mixture to a prepared pan, then place in oven.
Bake for 40-50 minutes, or until golden brown on top and a toothpick inserted into the center comes out clean.
Remove from the oven, and let cool on a wire rack. Run a knife around the edges to make sure it doesn’t stick to the sides of the pan, and remove from pan. Let it cool completely before serving, and enjoy!

oooh (dutch) baby!
Dutch baby topped with lemon sugared strawberries & ricotta cream
I have to admit: we’ve been in a breakfast rut of sorts. Pre-quarantine life, my husband and I used to treat ourselves each weekend to a trip to a local diner. We’d enjoy huge breakfasts of giant stacks of pancakes, waffles topped with bright strawberries & whipped cream, crispy bacon, corned beef hash, runny eggs… Ugh, I can’t even go on. I miss diners so much! That must be the Jersey girl in me.
Now that we’ve been doing breakfast at home, I got into a sort of routine with our breakfast menu. Fried eggs, scrambled eggs, an occasional omelette, toast… some weekends I’ll whip up some pancakes and fry up some bacon. All very typical and easy. So when I saw one of my favorite recipe bloggers, Half Baked Harvest, post a whole Instagram story making a Dutch baby, I was glued and had to try it.
I had never seen a Dutch baby straight out of the oven before, and it was quite the sight! Now, if you don’t know what a Dutch baby is, it’s similar to a pancake but way more fun. The pancake batter is made of the usual ingredients: flour, milk, eggs, and melted butter (well, maybe that’s not typical as pancakes usually call for oil rather than butter). But the fun and exciting part is all in the cooking process! This breakfast treat starts on the stove, but is quickly transferred to the oven where it produces a beautiful rise. I definitely geeked out over this part, and if it wasn’t for the other steps needed to prepare the toppings, I would’ve posted up right in front of the oven to just watch this Dutch baby balloon up in the oven.
Keep reading and scrolling below to see what I mean!
I stayed pretty close to the original recipe here, including the lemon strawberry and ricotta cream topping. I’ve been loving strawberries this season, and had a huge tub of ricotta in the fridge, so decided to just try out the whole thing.
Going through the whole process, I’m so glad I took the time to prep and measure all of my ingredients before I started. Much of the process for the actual Dutch baby moves pretty quickly, so you’ll want to have your strawberries sliced, lemon zested, etc. all before you really get into it.
So, first thing’s first… pre-heat the oven to 450F and slice your strawberries.

Then, zest a whole lemon and mix it with granulated sugar to make lemon sugar.

Once you’ve got your lemon sugar, take about a third of the sliced strawberries and set them aside. Mix about two tablespoons of the lemon sugar with the other two-thirds of sliced strawberries. Let them sit and soak in that lemon sugar flavoring. The lemon sugar strawberries will be your topping.

Once you’ve got your strawberries and lemon sugar prepped, make the batter. While you’re making the batter, I recommend starting to heat up your skillet. You’ll need it to be hot, hot, hot!
Mix your batter ingredients until the batter is smooth and you don’t have any large clumps. When the batter is near-ready, throw two tablespoons of butter on the hot skillet and brown it. Once the butter is browned, pour your batter into the skillet. Quickly grab your fresh strawberries (the one-third that you didn’t mix with the lemon sugar), and lay them across the wet batter. Then pop the skillet into the oven for about 15 minutes, and watch the magic. Be sure not to open up the oven during the first 15 minutes or else your beautiful Dutch baby balloon may deflate and you won’t get the wonderful rise.
Here’s a badly lit picture inside my oven of when I initially opened the door. You can see the full rise (as well as all of the burnt mess inside my oven, so please don’t judge me!).

Forcing myself away from the oven window while it was rising, I made the ricotta cream. This was actually very easy, so I was still had time to get back to the oven window and watch the Dutch baby bubble up. If it’s not coming across in my writing, I was really very excited about the rise. I think I was a little nervous I wouldn’t get this one right and it wouldn’t rise, so I was very relieved and excited that it actually did!
To make the ricotta cream, you’ll want to use cold ricotta straight from the fridge. This will help it to keep that creamy consistency. I did not do this. I took my ricotta out while I was making the batter and it got to room temperature by the time I was ready to make the cream, resulting in a pretty runny mixture. Being almost seven months pregnant, I get pretty fearful of that dreaded pregnancy brain and was trying very hard not to forget to make the ricotta cream in the first place.
Oh well… you live & you learn, and that’s the whole point of this blog for me anyway. I am a beginner baker after all, and I learned a good lesson about temperature and the effects on whipped cream.
Anyway, making the ricotta cream is very easy with a food processor. Just throw the ricotta into the food processor, turn it on high for a couple minutes, and you’ve got your cream. Then add in powdered sugar and vanilla to give it a sweet cream flavor.
Once your cream is made, your Dutch baby should be just about ready to take out of the oven. Open the door. Marvel at the beauty. Then quickly top with the lemon sugar strawberries and ricotta cream. Et voilà!


Dutch Baby Topped with Lemon Strawberries & Ricotta Cream
Prep Time: 15 mins | Cook Time: 20 mins | Total Time: 35 mins
Dutch Baby Ingredients:
4 large eggs, room temperature
4 tablespoons of butter. Separated as follows:
2 tablespoons, melted
2 tablespoons, room temperature
2/3 cup whole milk, room temperature
2/3 cup (85g) all-purpose flour
1/2 teaspoon salt
2 teaspoons vanilla extract
1/3 cup fresh strawberries, sliced
Lemon Strawberry Topping Ingredients:
2/3 cup fresh strawberries, sliced
Zest of 1 lemon
1/4 cup granulated sugar
Whipped Ricotta Cream Ingredients:
8 ounces whole milk ricotta, cold
1/4 cup powdered sugar
2 teaspoons vanilla extract
Directions:
Pre-heat oven to 450F.
In a bowl, make the lemon sugar by combining the granulated sugar & lemon zest. Toss 2/3 cup of strawberries with 2 tablespoons of lemon sugar. Set aside.
Using a hand mixer or a stand mixer with the whisk attachment, whisk together the milk, flour, eggs, salt, vanilla, and melted butter until the batter is smooth and no large clumps remain. Small clumps are okay.
While you’re preparing the batter, heat a large skillet over medium heat. In the hot skillet, melt the remaining 2 tablespoons of butter in the skillet and heat until the butter is browned, about 3-4 minutes.
When the batter is smooth enough and the butter is browned, pour the batter into the skillet. Arrange the 1/3 cup of fresh strawberries over the batter. Sprinkle 1-2 tablespoons of lemon sugar over the batter & strawberries. Move the skillet into the oven and bake for 15 minutes until the pancake is fully puffed and browned on top.
DO NOT open the oven door during the first 15 minutes, or the Dutch baby may deflate.While the Dutch baby is in the oven, make the ricotta cream. Whip the cold ricotta in a food processor on high until it is smooth & creamy. Add in the powdered sugar & vanilla, and pulse to combine.
Remove the Dutch baby from the oven. Top with lemon sugar strawberries, additional lemon sugar to taste, and ricotta cream.

strawberries? whipped cream? biscuits? i KNEAD it!
Strawberry shortcake biscuits
I still remember the first time I had a strawberry shortcake. I was about 6 or 7 years old, and we took a family trip up to Maine. I think my grandparents and uncle were visiting from the Philippines, so we took a little road trip up and rented a house for a few days. I remember eating giant lobsters that we’d buy fresh, cook at home, and all enjoy in the little vacation house. And for dessert, my parents pulled out some fresh strawberries, mini shortcakes perfectly shaped to hold the filling, and a can of that good, good Reddi-Wip. I think I loved the whole DIY aspect of this dessert experience and the spray noise of Reddi-Wip always makes my mouth water immediately (even today, though I’ve now learned how to make homemade whipped cream that I think I actually like better! Keep reading for more on that). After that, I remember requesting strawberry shortcake any time I was asked what I’d like for dessert or what my favorite dessert was.
It’s still one of my favorite desserts, and can be so refreshing in the summertime. So seeing as it’s now mid-July and we’ve got the AC cranking at full blast, this seemed like the perfect treat for this weekend’s baking project. I found this recipe for strawberry bourbon shortcakes from another one of my favorite recipe blogs, Half Baked Harvest. The recipe seemed easy enough and so delicious except for one ingredient: bourbon. I’m nearly 7-months pregnant, so I just left out the bourbon from the strawberry topping recipe since we’re really only macerating them so we wouldn’t be cooking out any of the alcohol.
Side note: Did you catch that fancy new culinary term I learned today? Macerate. It really just means that you toss the berries in a sugary mixture and allow them to sit for a while to release the juices. Turns out I’ve been macerating in quite a few of the recipes I’ve been trying out for this blog!
Anyway, back to the recipe. I also love that this recipe puts a twist on the shortcake in that it’s not even a shortcake at all! We’re going to be setting the strawberries & cream on top of a light, buttery biscuit. I don’t think I would’ve really thought about doing it this way, but the photos looked beautiful, so that was enough to convince me! I’ve also never really made a biscuit before, so was excited to check that off my list of “things to try and bake.” Before we jump into the process, I should mention that I halved the recipe since it’s only me and my husband, and no one person needs 4 servings of strawberry shortcake biscuits, no matter how good they are! Alright, so here we go…
First, I got some more use out of my new food processor and tried out the grating function. I cannot believe how easy this made grating the butter. From tons of British Bake Off marathons and YouTube videos of Paul Hollywood’s “cheat’s puff pastry,” I know that using cold grated butter allows you to get butter throughout your dough and melt into the dough during the baking process to really get that buttery pastry. But I’ve never actually tried this, and the thought of grating butter has kind of turned me off from this method. I think I’ve just been afraid that the butter would completely melt in my hand while I was grating it.
Well, no excuses now because I’ve got a game changer: grating via a food processor. This thing grated that butter so fast that there was no opportunity for it to even melt. Honestly, it was so fast it was almost unsatisfying. I pulled out the whole giant food processor from the cupboard, and I was done with it in a matter of seconds! But, whatever, I could get past that for not having melted butter dripping all over my hands. That trade-off is pretty huge to me. Work smarter, not harder (or messier), right?
Then, I mixed my grated butter together with the flour and baking powder, added in buttermilk and honey, and kneaded it for a bit with my hands until it came together into a dough. Once it formed a dough, I rolled it out into a rectangle about 1-inch thick and cut it into 4 pieces. Then I transferred it onto a prepared baking sheet, brushed it with some more buttermilk and sprinkled some coarse sugar on top. Next, just pop those biscuits into the oven and bake at 400F for 15-20 minutes or until golden brown.


While the biscuits were baking, I macerated my strawberries. Basically, I just tossed my strawberries with some honey and sugar and let it sit until I was ready to assemble my biscuit cakes.
While the strawberries sat, I made the whipped cream. I’ve been watching a few homemade whipped cream recipe technique videos the past week, and have been finding that many bakers use mascarpone to get a very creamy whipped cream. I had been wanting to try this, so was excited this recipe actually called for it! It still blows my mind how easy it is to make whipped cream. I also thought adding in mascarpone would make it more complicated, but nope… you just whip it all together with the heavy cream until you get stiff peaks, and you’re done! The mascarpone really makes the stiff peaks something else too! I was never usually quite sure that my peaks were stiff enough when I was just using the heavy cream & sugar, but with the mascarpone, you will know for sure. The peaks kept their form, and it still tasted just as light and fluffy. I also loved how this recipe only used honey to sweeten the cream rather than sugar. Made me feel a little bit healthier, though I did add a teaspoon of vanilla extract.
The biscuits were ready soon after I was done making the whipped cream. I let them cool for a bit on a wire rack, then cut them in half horizontally and started the final assembly.
Just take the bottom halves of your biscuits, add a couple dollops of whipped cream, spoon some strawberries on top, then finish off with the top half of your biscuit, or enjoy open faced!
A few more steps than my original strawberry shortcake experience, but equally as satisfying and delicious!


STRAWBERRY SHORTCAKE BISCUITS
Prep Time: 20 mins | Bake Time: 20 mins
Total Time: 40 mins
BISCUIT INGREDIENTS:
3.5 C (448g) all-purpose flour
1 TBS (22g) honey
1 TBS (8g) baking powder
1 C salted butter, grated and chilled
1 C buttermilk
Coarse sugar for sprinkling
strawberry topping ingredients:
6 C fresh strawberries, cut into quarters
3 TBS (63g) honey
1 TSP granulated sugar
WHIPPED MASCARPONE:
4 oz mascarpone cheese
1 C heavy cream
2 TBS (42g) honey
2 TSP vanilla extract
INSTRUCTIONS:
Pre-heat oven to 400F and line a baking sheet with parchment paper.
In a mixing bowl, combine the flour and baking powder. Add the grated butter and toss with the flour mixture. Add the buttermilk and honey, and mix until just combined. Use your hands to bring the dough together.
Roll the dough out into a 1-inch thick rectangle. Cut the dough into 8 rectangles. Place each piece onto the prepared baking sheet, and brush with buttermilk. Sprinkle the coarse sugar on top.
Transfer the biscuits to the oven and bake until golden brown, about 15-20 minutes. Cool before assembling.
Toss the strawberries, honey, and sugar together. Set aside for at least 15 minutes.
While the biscuits are baking and the strawberries are macerating, make the cream. Using a hand mixer or a stand mixer with the whisk attachment, whip together the mascarpone cheese and heavy cream until just before stiff peaks form. Add in the vanilla, and whip until stiff peaks form. Fold in the honey using a rubber spatula.
Assemble! Slice each biscuit in half horizontally. Take the bottom half, and add a dollop of cream, spoon on the strawberries, and finish off with the top half of the biscuit. Alternatively, enjoy open faced and use both halves as the bottom. Repeat with remaining biscuits.

Is it a cheesecake? Is it a cookie? Why choose?!
A cheesecake and a cookie all in one
I’ve mentioned this in previous posts, but I really do love to make mini-sized things. Maybe it’s because I’m 6-months pregnant with a tiny little human growing inside me and buying tiny little human things, but everything tiny and mini just makes me so happy these days. So when I found this recipe for raspberry cheesecake cookies from Baker by Nature, I thought, “Well, these are basically mini cheesecakes, so I’m definitely trying these!”
But also, this recipe basically combines two of my favorite things: cheesecake & cookies. Not to mention there’s a serving of fruit, so it’s basically healthy, right?!
The original recipe seemed easy enough. You make some cookie dough. You press your thumb into the cookies. And you top with jam. So I thought I’d make it a little more challenging for myself and make some homemade jam. As I learned with my strawberry cheesecake, making jam is actually pretty easy. So adding that step actually just made for an easier way to kill time during the inactive parts of this cheesecake cookie recipe. Trust me… if I think it’s easy, then homemade jam is nothing to be intimidated by! So let’s get started…
Obviously using the stand mixer that my loving & supportive husband surprised me with a few months ago, I beat together the room temperature cream cheese and butter until it was light & fluffy. I always get so nervous that I haven’t left enough time to allow my ingredients to come down to room temperature, so I tend to leave them out on the counter a little too long. This time, I took my ingredients out before we ventured out to Target for the first time in months since quarantine, so I also did not account for the July heat and how excited I’d be just to browse through the aisles at my beloved Tar-jay (and yes, you have to say it that way when referring to it ever-so-endearingly). Needless to say, my cream cheese & butter were barely holding up their once rectangular shapes in their wrapping. I go into this detail as a warning: learn how long it actually takes to get your ingredients to room temperature. And if you’re in a pinch, watch this amazing trick to do so quickly from one of my favorite baking blogs, Sally’s Baking Addiction. Otherwise, you don’t really get that light & fluffy texture that recipes call for. I did not… at least I didn’t think I did, but the cookies still turned out fine. I’d either chalk that up to luck or the extra chilling time I allowed later to make up for it. More on that later.
Anyway, once the cream cheese and butter are beaten (until light & fluffy), add in the sugar and beat well. Then add in the flour, a little bit at a time, until just incorporated. Cover the bowl with plastic wrap and place in the fridge for at least 45 minutes and up to 2 hours. Given the state of my cream cheese & butter, I let it chill for the full 2 hours.
While the cookie dough was chilling, I started on the homemade raspberry jam. This only took two ingredients: raspberries & sugar. I learned another trick this weekend: warm sugar dissolves quicker. And since my cookie dough was so melty, I figured I had time.
In an oven heated to 250F, place your sugar in a shallow, oven-safe pan and let it warm up for 15 minutes. While it’s warming, bring the raspberries to a boil in a sauce pan, squishing them down and stirring constantly as they heat up so that it turns into a liquid. Add the warm sugar, stir, and return the mixture to a boil. You’ll know it’s done once the mixture is thick enough that when you dip the back of a cool metal spoon into it, the liquid comes together first before dripping off the spoon when the spoon is turned horizontally. That might sound confusing, but it’ll make sense when you try it and see what I mean.

Once your dough is chilled, remove it from the fridge, pre-heat the oven to 375F, and line a large baking sheet with parchment paper. Using a small cookie scoop — mine is about 1.5 inches — scoop out evenly sized balls of dough, roll them in your hands until smooth, then press down onto each ball with your thumb. Place onto lined baking sheet and repeat until you’ve scooped out all your dough. I was able to get 19 cookies with my cookie scoop.

Since the dough warmed up again from my hands, I placed them back in the fridge for another 10 minutes to make sure they’d keep their shape. Once they were cool again, I filled each cookie with the jam.

Last, place the pan in the oven and bake for 11-12 minutes until golden around the edges. Cool them on the baking sheet for 10 minutes, then transfer onto a cooling rack to cool completely. It’ll be tempting to try them while they’re still warm from the oven, but I think the cooling is actually very necessary here since it is part cheesecake and so that the jam doesn’t spew out everywhere.
And there you have it! Raspberry cheesecake cookies. Enjoy!

Raspberry Cheesecake Thumbprint Cookies
Prep Time: 10 mins | Cook Time: 12 mins | Inactive: 45 mins
Total Time: 1 hour, 7 mins
Cheesecake Cookie Ingredients:
4 ounces cream cheese, room temperature
8 tablespoons salted butter, room temperature
88 grams granulated sugar
152 grams all-purpose flour
Raspberry Jam Ingredients:
170 grams raspberries
170 grams granulated sugar
Instructions:
Using a hand mixer or stand mixer fitted with the paddle attachment, beat together the cream cheese and butter until light & fluffy.
Add the sugar and beat well.
On low speed, add in the flour, a little bit at a time, beating until just incorporated.
Cover the bowl with plastic wrap and place in the refrigerator for at least 45 minutes and up to 2 hours.
If making homemade jam, place the sugar in an oven-proof, shallow pan and warm in the oven at 250F for 15 minutes.
While the sugar is warming in the oven, place the berries in a sauce pan and bring to a boil over high heat, mashing the berries down as they heat. Boil hard for 1 minute, stirring constantly.
Add in the warm sugar and return the mixture to a boil. Stir constantly until mixture is thick enough that it sticks to the back of a cool metal spoon before dripping back down. Remove from heat and set aside while preparing the cookies.
Pre-heat the oven to 375F and line a large baking sheet with parchment paper. Remove the cookie dough from the refrigerator.
Using a cookie scoop, scoop out evenly sized balls of dough and roll them in your hands until smooth. Lightly press your thumb in the center and lay the dough onto the baking sheet, leaving at least 1 inch between each. Repeat until you’ve scooped out all of the dough. Place the baking sheet in the refrigerator for another 10 minutes.
Remove from the refrigerator and fill each cookie with jam.
Place the pan in the oven and bake 11-12 minutes until golden around the edges.
Remove from the oven and cool on the baking sheet for 10 minutes. Transfer each cookie onto a cooling rack to cool completely.
Enjoy!

You’ve got a piece of my tart
Mini lemon tarts topped with homemade whipped cream and candied lemons
Guess I’m on a pie/pastry roll! Last week’s bake was good practice with some pastry and filling, but I obviously couldn’t wait for my tart pans to come in and luckily found the galette recipe to satisfy my pie craving. But this week, my tart pans arrived!
Remember how I told you about that little shopping addiction I’ve got? Well pair that with this habit I’ve got of jumping right into hobbies, and it makes for very little self-control. When I decided last week that I wanted to make all kinds of pies, pastries, and tarts, that translated to an Amazon order of all kinds of tart pans. You never know when you need to make one large tart or 6 mini-sized tarts, right? I like options, okay?
Anyway, I was so so so excited to test out my new tart pans and am still on a kick about mini bakes, so mini tarts it was! And I found this beautiful and actually very easy recipe from amazing lawyer-turned-baker, Vallery Lomas, for a lavender-honey lemon tart.
This recipe gave me some great practice with shortcrust pastry and my first ever curd! I have to admit: I was a little intimidated by the thought of making a lemon curd, but this recipe is super easy to follow. Just make sure to constantly whisk! I think that’s the part that intimidated me the most — curd is not something you can easily multi-task with. However, it does make for a great arm workout. That’s calories you burn making this, which basically justifies eating them right?!
While I would’ve loved to try out the lavender honey bit because that sounds so deliciously fancy, unfortunately lavender is not something on hand in my kitchen (or imaginary garden), so I essentially just skipped that part. However, don’t skip out on the candied lemon step! Even if candied lemons aren’t your thing taste-wise, they make for beautiful decorations. I also used my extra lemon zest to make a sugary, zesty sprinkling to top over the homemade whipped cream.
If you ever asked me 10 years ago if I could make homemade whipped cream, I probably would’ve just stared blankly at you and not have even known where to start. But it’s one of the easiest things to do! Throw it into a piping bag with a pretty tip, and you’re on the easy road to baking beauty!


MINI LEMON TART RECIPE
Shortcrust Pastry Ingredients: (makes 4 mini tarts or one full-sized tart)
1C (128g) all-purpose flour
1/4C (32g) powdered sugar
1/4 tsp salt
1/2C (8 tbs) unsalted butter, melted
Lemon Curd Ingredients:
1/4C (85g) honey
1 tsp unflavored gelatin
4 large eggs
3/4C (150g) granulated sugar
4 lemons (2 tsp zest, 3/4C juice)
2 tbs unsalted butter, cubed
Candied Lemon Ingredients:
1/4C honey
1/4C water
1 Thinly sliced lemon (discard the ends)
Lemon Zest Sugar Sprinkle Ingredients:
2 tbs lemon zest
1/2 tbs granulated sugar
Whipped Cream Ingredients:
1C heavy cream
2 tbs confectioner’s sugar
1/2 tsp vanilla extract
Directions:
In a medium bowl, whisk together the flour, powdered sugar, and salt. Stir in the melted butter until the dough comes together. If you’re making mini tarts, divide the dough into 4 equal parts. Press each piece into the bottom and up the sides of each of your tart pans. Refrigerate for at least 20 minutes.
While the dough is chilling, preheat the oven to 350F. When the dough is ready, remove them from the refrigerate and prick the bottom of the crust all over with a fork or toothpick. Line the crust with parchment paper and fill with pie weights or dried beans. Bake for 20 minutes. Remove the parchment paper and pie weights, and bake another 10-15 minutes or until golden. Let them cool on a wire rack.
While the crust cools, make the lemon curd. In a small bowl, sprinkle the gelatin over 4 teaspoons of cold water. Set aside.
In a medium saucepan, whisk together the eggs, granulated sugar, and lemon zest until combined. Whisk in the lemon juice. Cook over medium heat, whisking constantly or until thick and creamy. About 10 minutes.
You’ll know the curd is ready if it can thickly coat the back of a spoon and a stream remains visible when you run your finger across the spoon.Remove from heat and stir in te cubed butter until it melts into the curd. Stir in the gelatin mixture until combined.
Pour the curd into the cooled crust(s). Refrigerate for at least 4 hours or until set. While the tarts are cooling, prepare your toppings.
To make the candied lemons, first preheat the oven to 275F. Then heat the honey and water in a large straight-sided skillet. Stir often to dissolve the honey. Add the lemon slices to the skillet. Remove from heat and let stand 10 minutes.
Line a baking sheet with parchment paper. Remove the lemon slices from the syrup and arrange them in a single layer on the prepared baking sheet. Bake 30-40 minutes or until lightly browned. Turn them once halfway through, but check every 10 minutes and remove each slice as they brown. Set aside until you’re ready to decorate your tarts.
To make the lemon zest topping, simply combine the lemon zest and granulated sugar. Set aside.
If you’re making the homemade whipped cream, I recommend waiting until you’re ready to serve the tarts. Whipped cream is best cold and fresh, and it will hold its shape best the sooner you serve. Using a hand or stand mixer with the whisk attachment, combine the heavy cream, powdered sugar, and vanilla extract in the bowl by whipping on medium-high speed until medium to stiff peaks form. This takes about 3-4 minutes, but don’t walk away from it! It only takes a fraction of time before it becomes over-mixed and will curdle. Dollop onto the tarts or use a piping bag for a more structured design.
Top with candied lemons and lemon zest sugar sprinkling. Serve and enjoy!

I love cake a (laming)TON!
Lime mango lamingtons coated in shredded coconut
Full transparency: I had never heard of a lamington before attempting this weekend’s baking project. I’ve never heard of them and have never seen one, and so was very pleasantly surprised when my Australian husband took a look and exclaimed, “Wow! Those really look like lamingtons!”
If you are also unfamiliar with this sweet treat from down under — and no, I’m not talking about my husband ;) — lamingtons are an Australian cake made from squares of sponge cake and traditionally coated in chocolate and coconut. Sounds good, right? I know I’m definitely going to plan to indulge in some next time we make our way down to Australia!
So how did I get to baking lamingtons this weekend without a single clue as to what they even were? Well, I just got two very exciting deliveries recently (there’s that shopping addiction I mentioned):
The New Way to Cake cookbook by Benjamina Ebuehi from season 7 of The Great British Bake Off
A Cuisinart food processor
Obviously, my next baking project had to be from Benji’s new cookbook and had to be a recipe that required a food processor. So as I flipped through every page of this gorgeous cake book, I found this delicious and summery recipe for lime, coconut, and mango lamingtons. Perfect for the season and perfect for trying out my new toy. Win, win!
What I love about all of the recipes in this book is that they are all so easy to follow. So easy that even if you’ve never heard of these baked goods, you can still easily follow along! With that, follow along below as this beginner baker attempts a brand new recipe…
First, I started by prepping the fresh fruit ingredients. I chopped up the mangoes into 1-inch pieces so that I could easily pop them into my new food processor when I was ready. Then I zested my limes and made the lime zest sugar.


I set the mangoes and remaining limes (minus the zest) aside, and started making the sponge cake. I combined the lime zest sugar, butter, and vanilla using my stand mixer until it was pale and fluffy as directed. I’m still coming to terms with what directions like this mean, but think I got to a good place (given it turned out to be quite successful!). Here’s what pale & fluffy means to me:

Once you’re happy with the consistency of the sugar, butter, and vanilla, add in 3 eggs one at a time. Next add your dry ingredients (flour, cornstarch, and baking powder sifted together) and milk in batches, alternating between the two, starting and ending with the flour. Sifting the dry ingredients together and alternating between the dry ingredients & milk were very specific instructions from the book. I’d never taken the time to do either of those steps with cakes in the past, and think that was key to this sponge coming out so light and airy — I loved it!
When all of the ingredients are combined, pour into a prepared pan and bake for 30 minutes, or until a toothpick inserted into the center comes out clean. Take it out of the oven and let it cool.

While the sponge is cooling, prepare the mango purée. Throw the cut mango pieces, confectioners’ sugar, and lime juice into a food processor. Process until smooth, then set up your two dipping stations: 1) a shallow bowl with the mango purée and 2) a large dish of shredded coconut.


Now, back to the cake! Once it’s cool, trim the edges and cut into cubes. The recipe calls for 16 cubes, but I tend to prefer smaller pieces, so ended up with 21 not-so-perfectly-shaped rectangles/squares. Then, with each sponge cube, dip it into the mango puree and coat all sides, then roll the mango-coated cube around in the shredded coconut until it’s fully coated. Place each cube onto a wire rack and continue until you’ve coated all of the little cakes in mango purée and shredded coconut. Here’s the hard part: wait until all of the cakes have firmed up before digging in or arranging on a serving dish or cake stand!


LIME, COCONUT & MANGO LAMINGTONS
Prep: 10 minutes | Bake: 30-40 minutes | Total: 1 hour and 5-15 minutes
Lime Sponge Cake Ingredients:
1 1/2 C (190g) all-purpose flour
1 1/2 TBS (12g) cornstarch
1 TBS (15g) baking powder
Zest of 2 limes
1 C (200g) granulated sugar
1 C (225g) unsalted butter, room temperature
1 TSP vanilla extract
3 eggs, room temperature
1/2 C (120 mL) milk, room temperature
Mango Purée Ingredients:
2 medium-sized ripe mangoes, cut into 1-inch pieces
3/4 C (105g) confectioners’ sugar
Juice of 1 lime
Coconut Coating Ingredients:
2 C (200g) shredded unsweetened coconut
Directions:
Preheat oven to 350F and grease an 8x12-inch baking pan and line with parchment paper.
Sift the flour, cornstarch, and baking powder together in a medium bowl. Set aside.
Using your fingers, combine the lime zest and granulated sugar in the bowl of a stand mixer until the mixture feels like wet sand.
Attach the paddle attachment and combine the lime zest sugar, butter, and vanilla extract until pale & fluffy. Add the eggs one at a time. Mix in the dry ingredients and milk, alternating in batches.
Pour the batter into the prepared baking pan and bake for 30-40 minutes, or until a toothpick inserted into the center comes out clean. Remove from oven and allow to cool for 5-10 minutes. Remove from the baking pan and allow to cool completely on a wire rack.
While the cake is baking/cooling, prepare the mango purée. Using a food process, combine the mango pieces, confectioners’ sugar, and lime juice until smooth. Pour into a shallow bowl and set aside.
Cut the edges off the sponge, then cut into cubes. Dip each sponge cube into the mango purée, coating completely, then roll in the shredded coconut. Place on a wire rack and repeat with remaining sponge cubes.
Allow coated sponges to firm up on the wire rack, about 10-20 minutes.
Serve and enjoy!

Galette me have some sweets!
Mini berry galettes
There’s something so appealing about mini desserts. It’s like because they’re smaller, they also pack less guilt… which also means I can have more, right?! I love the idea of mini pies, but don’t have any little mini pie pans, so when I came across this recipe from one of my favorite baking blogs, Sally’s Baking Addiction, for mini fruit galettes, it just seemed like the perfect recipe to try!
If you’re like me, a galette may be an unfamiliar term and sounds very fancy. And if you do recall seeing these lovely little treats at a bakery, you’ve probably seen some very fancy & beautiful ones indeed. However, rest assured, they’re essentially just deconstructed pies! Which means no mini pan needed!
This was the perfect opportunity for me to practice some pastry crust AND get me a mini dessert. With the berries, they’re also kind of red-white-and blue, so 4th of July themed too right? Win-win all around!
Sally also has a great video tutorial on her site, so after watching that a few times, I took to the kitchen and here’s where I ended up:


Not too bad, if I say so myself! Especially for someone who had to even google what a galette is! I ended up with a mix of fresh blueberries and frozen raspberries just because that’s what I had in my fridge, but I’ll definitely be trying this again with different combinations of fruits and fillings.
Here’s the final recipe I ended up using, but all thanks to Sally at Sally’s Baking Addiction for the flaky pie crust recipe, direction on how to turn a pie crust into a galette, and inspo on the filling. Note, I cut the pie crust recipe in half so that I’d only have 4-5 galettes (there’s only 2 of us in my house, so there was no need to have too much temptations laying around at the end of the day!). I also don’t use shortening, so just add a couple more tablespoons of unsalted butter to make up for it.
MINI FRUIT GALETTE RECIPE
Flaky Pie Crust Ingredients:
1 1/4 C (158g) all-purpose flour
1/2 + 1/8 tsp salt
8 tbs (1/2 C) unsalted butter, chilled and cubed
1/4 C (60 mL) ice water
Tip: measure 1/4 C water then add ice and mix to get all of the water cold, then measure 1/4 C water from that mixture
2 tbs whole milk
Filling Ingredients:
1 1/2 C blueberries (mine were fresh, but you can use frozen ones too if that’s all you’ve got)
1 C raspberries (mine were frozen just because that’s what we had)
1 tbs (8g) cornstarch
2 tbs (25g) granulated sugar
1 tsp vanilla extract
Instructions:
Start by making the pie crust. You can either use a food processor or a pastry cutter. If using a food processor, combine the flour, salt, and butter until you have pea-sized bits. If using a pastry cutter, mix the flour and salt together in a large bowl, then add the butter. Cut the butter into the mixture until you have pea-sized bits.
Drizzle the ice water into the mixture 1 tablespoon at a time.
If using a food processor, continue to add the ice water until your mixture starts to stick together when hold it in your hands.
If you’re going the manual route, stir the water in 1 tablespoon at a time using a rubber spatula. Stop when the dough begins to form large clumps.
Transfer the dough to a floured surface. The dough should come together easily and not feel overly sticky. Use floured hands to fold the dough into itself until it’s fully incorporated.
Form the dough into a ball. Flatten it into a 1” thick disc using your hands. Wrap the disc tightly in plastic wrap and refrigerate for at least 2 hours (or up to 5 days).
While the dough is chilling, prep your filling. Combine the fruit, sugar, cornstarch, and vanilla. Place in the refrigerator and let it sit.
Once the dough is chilled, unwrap it and place it onto a lightly floured surface. Roll the dough out using a rolling pin into a large 12 inch circle.
From the circle, cut out 5-6 inch circles. I used the rim of a bowl and pressed it down into the dough to get these circles. Continue to re-roll the dough until you get as many circles as you can.
Be sure to work quickly on this step as the dough gets harder to work with the warmer it gets.
Arrange your dough circles onto a baking sheet lined with parchment paper. Take your filling from the refrigerator, and place about a quarter cup of filling in the center of each circle. Be sure to leave any excess juice in the filling bowl - if you have too much juice inside the dough, it’ll overflow as it bakes.
Once you’ve added your filling, gently fold the edges towards the center, pinching slightly as you fold each edge over the last fold and leaving the center exposed. You’ll want to make sure the edges are tightly folded so that it doesn’t unravel when it bakes.
Brush the edges of the pie dough with milk and sprinkle granulated or coarse sugar on top. This will give it a nice golden brown when it bakes.
Place the tray in the refrigerator for at least 20 minutes or up to 4 hours.
Pre-heat the oven to 375F. You can do this while the galettes are chilling in the fridge.
Bake for 25-28 minutes or until golden brown.
Remove from the oven and carefully lift each galette from the baking tray and place onto a cooling rack. Cool for at least 5 minutes.
Optional: dust with confectioner’s sugar or top with whipped cream.
Enjoy!

Did it all for the cookie…
Salty, sweet, ooey, gooey chocolate chip olive oil cookies
Over the last few months on this baking journey, I’ve tried everything from cakes with unique flavors (i.e., my chai-spiced cake from last week’s post), bread loaves that haven’t always turned out perfect (here on the IG if you’re curious to see the least Instagrammable bread you’ve ever seen), and pastry dough for pastries I’ve never even heard of (stay tuned for next week’s post!). But for some reason, I kept putting off cookies. I’m not too sure what’s intimidated me about trying to bake cookies, but I decided this week that I’m ready to take the whisk (couldn’t help the pun there).
And because I can’t help but jump into non-traditional bakes, I went for an olive oil chocolate chip cookie topped with sea salt. Found the recipe from Broma Baker (same blogger that inspired the chai-spiced cake I posted about last week). Sounds like a fancy cookie, but was super easy to bake!
First I combined the wet ingredients in my stand mixer, then added in the dry ingredients. After this step, I was tempted to just ditch the baking part and go straight for the cookie dough. Unfortunately (or fortunately for me), that’s not well-recommended at 6 months pregnant…

Once all of the ingredients are combined, I put the dough in the refrigerator for 15-20 minutes. The original recipe didn’t call for this, but it felt hot in my apartment and the dough seemed to be sweating a bit so I was afraid it would spill out too much when baking. I also just watched this great video on cookie tips from Sally’s Baking Addiction and wanted to put some of my new knowledge to the test.
After the dough was chilled, I used a small ice cream scoop to scoop the dough out into evenly sized dough balls onto a lined baking sheet. I purchased a set of 3 sizes of ice cream scoops on Amazon a few months ago but really only just got myself worked up to actually make cookies. So glad I got these though because it made for prepping the cookies incredibly easy and neat!

I will say though… I was a little overly ambitious using the 2 oz scoops to make one batch on this baking sheet. I probably should’ve spaced them out a bit more and made at least two batches, but honestly I didn’t really mind the way it turned out as you’ll see below. A friend called it “a cookie cake with suggested portion lines” and I loved that. Exactly what I was going for!

Then I let them cool just slightly before topping with some sea salt. I didn’t want them to cool too much because I wanted the sea salt to stick to the chocolate while it was still melty & gooey.
Once they cooled a bit more, I transferred them to a wire rack to cool until completely set before placing them on a plate to serve. Et voilà!


SEA SALTED OLIVE OIL CHOCOLATE CHIP COOKIES
Ingredients:
6 tablespoons unsalted butter, melted
2 tablespoons extra virgin olive oil
1 large egg, room temperature
3/4 C (165 g) light brown sugar
1/4 C (50 g) granulated sugar
1/2 teaspoon salt
1 teaspoon vanilla extract
1/2 teaspoon baking soda
1 1/3 C (171 g) all-purpose flour
4 ounces dark chocolate, roughly chopped
Directions:
Preheat oven to 350F. Line a cookie sheet with parchment paper.
In the bowl of a stand mixer or large mixing bowl, combine melted butter, olive oil, egg, granulated sugar, brown sugar, salt, and vanilla. If using a stand mixer, use the paddle attachment to combine. In a separate bowl, whisk together the flour and baking soda. Fold the flour mixture into the wet ingredients until just combined. Fold in the chopped chocolate.
Cover with plastic wrap and chill in fridge for 15-20 minutes.
Remove from the refrigerator. Scoop the dough onto the baking sheet using a 2-ounce ice cream or cookie scoop. Be sure to leave at least an inch (what I did above) or more between each scoop.
Bake for 12-17 minutes until light golden brown. Allow to cool slightly before sprinkling sea salt over the top.

Will-ube-mine swirl rolls
Ube-filled swirl buns topped with an ube cream cheese icing
Let’s start by talking about what ube (pronounced: oo-beh) is! Ube is a very popular ingredient from the Philippines made from purple yam. While it’s been around in the Philippines for forever and can be found on basically any Filipino menu, ube has really only started to grow in popularity in the US. Its rich, vibrant purple color makes it oh-so Instagrammable, likely adding to the curiosity and increased presence in America. You can even find ube pancake mix at Trader Joe’s now!
Ube’s most common form is an ube jam or paste called ube halaya, which is made by boiling then mashing purple yam, then combining it with other ingredients including coconut milk, condensed milk, evaporated milk (all of the milks), and sugar to bring out a subtly sweet taste that adds a delicious flavor to many Filipino treats such as flan, cakes, and ice cream. Ube halaya is also a popular topping for one of the most quintessential (and one of my favorite) Filipino desserts: halo-halo. While ube halaya translates to ube jam, it’s much thicker than American jams and almost solid — not like a jam you’d spread over toast or pastry. In fact, I usually just like to sneak cheeky spoonfuls of it, especially when it’s homemade!
Speaking of homemade, a tita of mine recently dropped off a couple jars of her homemade ube halaya. Boy was I excited! Since quarantine started, I haven’t been able to get my hands on some since the Filipino stores were closed or not operating at full capacity. So after polishing off half a jar on its own (don’t judge me), I couldn’t wait to try out some ube-flavored treats.
Knowing my beloved ube jam was in short supply, I didn’t want to waste it experimenting. So I figured a safe (and easy) bet would be ube swirl rolls! I only used about a quarter of my second jar for both the swirl rolls and the ube cream cheese icing — and I did NOT go small on the icing. These rolls came out perfectly soft and chewy with just the right amount of sweetness. It’s hard to go wrong with cream cheese icing, but the ube flavor added another level of goodness that I couldn’t help myself when topping over the rolls. As you can see from the pictures below, I did more than top them with icing… more like smothered them in icing!

Pre-smother when you can actually see my purple ube swirls

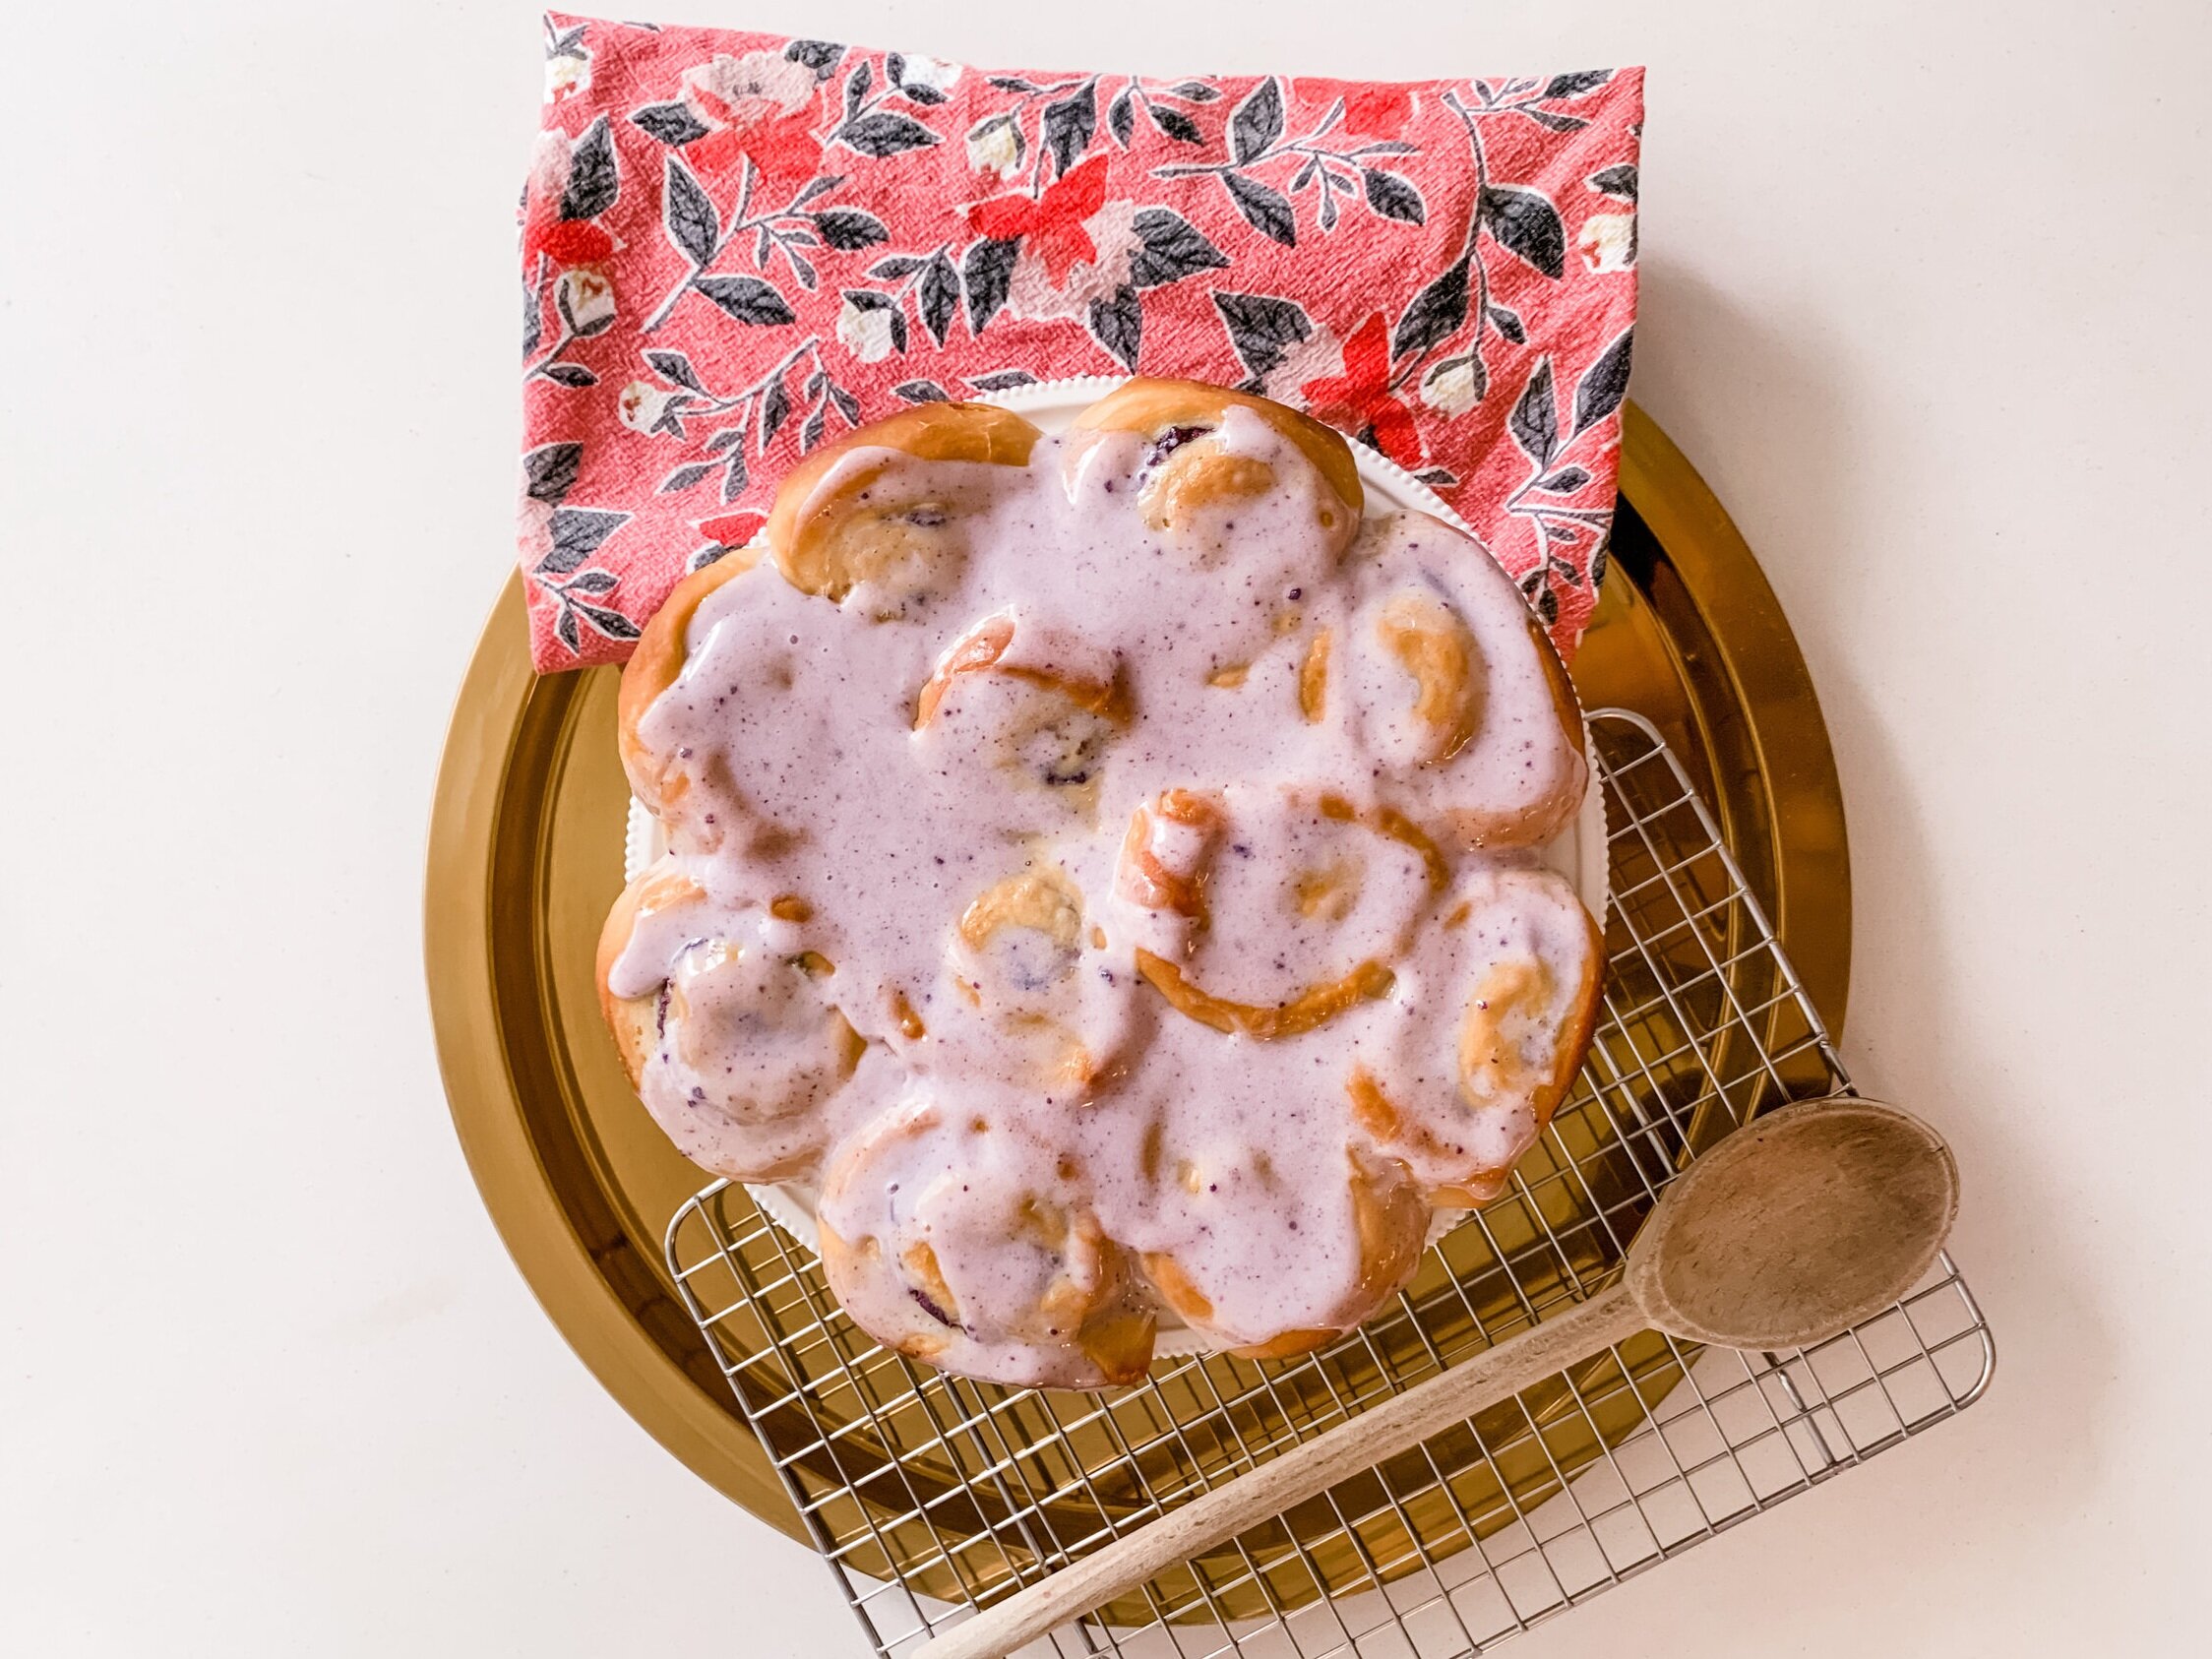
UBE SWIRL ROLLS WITH UBE CREAM CHEESE ICING
Roll Ingredients:
1 packet of active dry yeast
1/2 C warm water (100F-110F)
1/4 C unsalted butter, softened to room temperature
1 large egg, room temperature
1/2 C (100g) granulated sugar
1 C buttermilk
1 tsp salt
4 1/2 - 5 C (576-640g) all-purpose flour
Ube Filling Ingredients:
4 oz (112g) ube halaya
1 tbs unsalted butter, softened to room temperature
1 tbs (13g) granulated sugar
Ube Cream Cheese Icing Ingredients:
2 oz cream cheese, softened to room temperature
1/4 C unsalted butter, softened to room temperature
1 C (128g) powdered sugar
2 oz (56g) ube halaya
2-6 tbs whole milk, depending on how thick or runny you like your icing
Instructions:
In a small bowl, dissolve the active yeast in warm water. Set aside 5-10 minutes or until it foams at the top.
Using a stand mixer with the paddle attachment on low setting, beat the egg, sugar, butter, and salt until well-combined.
Add the yeast mixture, buttermilk, and 2 C (256g) of flour until well-blended.Switch out the paddle attachment for the dough hook and continue adding the remaining flour (2 1/2 C or 320g) until a soft dough forms.
Place the soft dough on a lightly floured surface and knead by hand for about 5-7 minutes or until the dough is smooth.
When ready, place the dough into a greased bowl. Roll the dough around in the bowl to coat it with the grease. Cover loosely with a clean towel and set in a warm, draft free spot for 1 hour until the dough doubles in size. Or place in the refrigerator overnight if you’re planning to bake in the morning!
While the dough is rising, make the filling. Add the filling ingredients to a small sauce pan if heating over a stove or a microwavable bowl if heating in microwave. Heat ingredients together until you’re able to stir and combine easily.
Once the dough rises, punch it down in the bowl. Then roll the dough out onto a lightly flowered surface and roll it out using a rolling pin. You should be able to make a 13x18” rectangle, but don’t worry if it’s not perfect. You can always just trim the edges to make a rectangle that you can work with.
Using a spoon, spread the filling as evenly as you can across the dough. With the long side of the rectangle towards you, start rolling the dough up and over tightly. Once you’ve got it all rolled up, pinch the dough across to seal it. Cut into 1 1/15 inch sections. Place the pieces swirl side up into a greased pan. I used a round pan as you can see in the pictures, but any shape pan works as long as they all fit with at least 1 inch between each piece.
Loosely cover the pan with a kitchen towel and allow to rise until the dough doubles in size again or the edges are touching each other and the sides of the pan. This should take approximately 1 hour.
Pre-heat oven to 350F. Place the pan in the oven and bake for 30-35 minutes or until golden brown.
While the swirl rolls are baking, make your icing. Using a hand-held mixer or stand mixer with the paddle attachment, combine the icing ingredients until smooth. I recommend starting with just 2 tablespoons of milk and adding 1 tablespoon at a time until you have the consistency you prefer.
Take the rolls out of the oven, and allow to cool in the pan for 5 minutes. Either drizzle (or smother) the icing over your rolls while it’s still in the pan or carefully remove then top with icing.
Enjoy while they’re still warm!

Chai it… you’ll like it!
Three layer chai spiced cake with vanilla cream cheese frosting
I have to admit: I never really got into the whole chai tea latte trend. I may have ordered one at Starbucks once just to see what all the rage was about (or I may have tried a friend’s), and I’ve gotta be honest. I really didn’t get the hype. In all honesty, it kinda tasted like dirt to me…
To give chai tea some credit, they do smell great. The aromas of the spice with a bit of sweetness do just make me feel all warm and tingly inside. So what does that say? I prefer chai as a candle scent? That’s gotta exist, right?
Well, I may not have enjoyed it as a drink, but the scent hasn’t fully closed the chai door for me. I knew deep down there would be some other way or form I could enjoy that spiced sweet flavor. Then this past winter, I watched about 40 hours straight of British Bake Off, and quite a number of bakes kept catching my attention and I quickly realized they all had a common flavor theme: spiced chai. After about another 20 hours of binging Bake Off and a couple hours of recipe research, I found a recipe that seemed on my level of baking skills to try out, made my way to the spice aisle of the grocery store, and I was ready to start pre-heating the oven and get baking.
Big giant kudos to Sarah over at Broma Bakery for the beautiful food photography skills that made wanting to learn this recipe irresistible and writing up such easy to follow directions for this Chai Spice Cake with Vanilla Cream Cheese Frosting.
In all honesty, the toughest part about this whole thing was finding the cardamom in the spice aisle! I also wasn’t feeling confident enough to splurge on some edible gold leaves, and gave up on finding whole cinnamon sticks after trips to two different grocery stores. BUT, blueberries were on sale so my topping and design took its own turn, and I was quite happy with the result. And in the end, I did find my chai flavoring nook: cakes.


I’m definitely my harshest critic, and the lopsidedness of the cake was really getting to me. It’s pretty subtle in the shot, but the middle part of my cakes rose up higher than the outer part of the cake. I did a bit more research into how the professionals solve for this, and think I’ll try some cutting/shaping techniques next time I make a multi-layer cake. This video from Everyday Food was super informative for cutting and frosting even layers. I tried to mimic Sarah’s technique from Broma Bakery, and create a somewhat unfinished look, but think it ended up being an in-between of thick frosting in some parts and just enough in some.
Practice makes perfect, and I’ll definitely be trying this one again!

I-love-you-berry-much cheesecake swirl
Strawberry swirl cheesecake
My first post.
If we know each other IRL (or if you’ve read the about section), you know the story behind this blog and the origin of the spite filling hiding inside the sugary sweet frosting. TL;DR I only started baking so regularly to prove a point to my husband that I’d actually use the hand mixer I purchased.
Well, here’s an unexpected plot twist that happened just before I embarked on this first entry. I have been baking so much and my husband has so thoroughly enjoyed the products of my spiteful baking that the other night he came home with this incredibly thoughtful surprise!

That’s right, baby! He went out and bought me the ultimate device every wannabe baker wants in their kitchen: a KitchenAid stand mixer. Can you imagine? The man who was skeptical of my little baby hand mixer, thinking I’d use it once and it would go on collecting dust just fully upgraded me to the Lambo of home kitchen devices. I think I won the long game here, and we’ve got it in writing, blogged to prove it!
Alright. Gloating done. Back to baking…
I thought I’d christen my gorgeous new mixer with a dessert to show the hubby that I love him berry, berry much. So here’s my attempt at a strawberry cheesecake.
Actually, I made 1.5 cheesecakes. As I was searching recipes to make a strawberry cheesecake swirl, I came across some small batch baking recipes. In the end, I think I ended up sort of combining a few normal sized recipes to piece together a strawberry cheesecake and then added 50% of everything to make a smaller cake in a loaf pan. Probably a little overambitious, but I think I tend to do that as well when jumping into new hobbies. Anyway, here it goes!
First, I started with some homemade jam. Another thing I’ve never done before, and who knew making jam was so easy! I ended up using an entire 16 oz (1 lb.) carton of strawberries. Definitely enough for my 1.5 cheesecakes with some extra for topping or for my toast tomorrow morning. No such thing as too much jam.

Next, I went for the crust. Now here’s where I think I probably should’ve stuck to one set of instruction and differentiated my bake times for the small and big cake. My “big” cake was done in a 9 inch spring form pan, and my small cake was done in a 9x5” loaf pan. Both recipes I found for the crust were so similar, but the bake times and methods were so drastically different. One seemed so easy, so in all honesty, that’s the one I went with. It only called for 8 minutes of pre-baking the crust, or until it was golden brown. By 10 minutes, both crusts actually looked golden brown, so I figured they were both done. That might have been true, but I think the next few steps to bake and chill the filling may have altered the end result of the crusts. More on that later. But if you want to avoid my mistake, I’ve included the directions for the full-sized cheesecake crust below that should really be followed.


The filling was actually so easy to make. But that may be due to my brand spanking new stand mixer! I’ve included the recipe below for the full-sized cheesecake, and if you’d like to make another mini one simultaneously as I did, just add another half serving of each.
Once you’re done making the filling, pour it into the pans and over the cooled crusts. Now the fun part - designing the swirl! Dollop spoonfuls of the jam on top of the cheesecake filling, and use a knife to swirl the jam around the top. I included full chunks of strawberries in mine, but I think it you want neater swirls, strain the chunks out and just use the jam sauce. Save the chunks to top the cheesecake later when serving.

And now for the bake. I baked the small cheesecake for about 50 minutes and the big one for about 60. Essentially, you’ll need to bake each until a toothpick comes out just about clean. After baking, cool on some cooling racks. Once they’re cooled, place your cheesecakes in the fridge to set. I left both of mine in over night, but recipes say they should be refrigerated for at least 6 hours and up to 1 day. I like my cheesecake no matter what temperature, but baker’s choice of serving straight from the fridge or take them out and allow to come down to room temperature before serving.
Et voilà!
